- Digitrax LocoNet®
-
- LocoNet Tools
- LocoNet Simulator
- Command Stations
- Programmers & Adapters
- Networking
- Technical
- Supported Hardware
- Devices, command stations, networks, and protocols:
- Anyma DMX
- Arduinos
- Atlas Commander
- Bachrus
- BiDiB
- CAN Bus Networks
- CBUS®
- C/MRI
- CTI Electronics (Acela)
- CVP EasyDCC
- Dcc4Pc
- DCC-EX EX-CommandStation
- DCC++
- DCC Specialities
- Digi XBee
- Digikeijs / YAMORC
- Digitrax
- DMX 512 (Powerline)
- ESU ECoS
- Fleischmann
- Hornby
- Insteon (Powerline)
- LCC
- Lenz
- Lionel TMCC
- LocoNet
- Maple Systems
- Märklin CS2
- MERG
- Modbus
- MQTT
- MRC
- NAC Services RPS
- NCE
- Oak Tree Systems
- OpenDCC
- OpenLCB
- Pi Engineering RailDriver
- Powerline
- Protrak Grapevine
- QSI Quantum Programmer
- Raspberry Pi
- RFID Readers
- Roco
- SPROG DCC
- SPROG DCC Generation 5
- SRCP server
- TAMS Master Control
- TracTronics SECSI
- Uhlenbrock Intellibox
- Viessmann Commander
- Wangrow System One
- WiFi Throttles
- X10 (Powerline)
- XPressNet
- Zimo MX-1
- ZTC Controls
- Applications
- By the community of JMRI.org:
- Tools
- JMRI tools for working with your layout:
- Common Tools:
- Blocks:
- Routing and Control:
- Other:
- System-specific...
- Web server tools...
- Layout Automation
- Use JMRI to automate parts of your layout and operations:
Hardware Support: Digitrax DCS52
Hardware Support: Connecting to a Digitrax DCS52
JMRI may be connected to the Digitrax DCS52 in any of a wide variety of ways. Since the DCS52 has a built-in USB interface, it is possible to simply plug a USB cable into the computer and the DCS52, and configure JMRI to suit this connection. It is also possible to use another LocoNet interface device, such as a LocoBuffer-USB, Digitrax PR3, or Digitrax PR4, to interface a computer to LocoNet, and connect that LocoNet to the DCS52. JMRI does not prefer any one connection method over any other method. Choose one which is suitable for your needs.
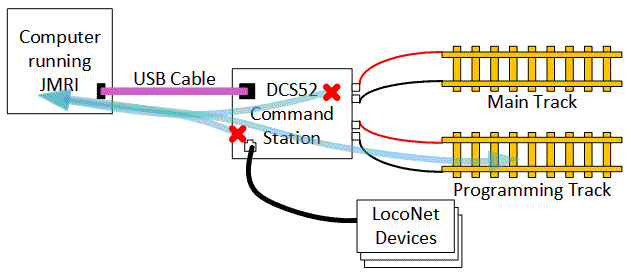
If a USB cable is used to connect the JMRI computer to the DCS52's USB connection, JMRI may be configured in one of two modes. If the computer will only be used for decoder programming, and JMRI will not need access to LocoNet features other than the DCS52 "programming track", then JMRI may be configured to use a "connection" where the DCS52 USB interface is placed into a mode where it acts as a standalone decoder programmer. In this mode, JMRI will access the DCS52 dedicated programming track connections. This mimics the "standalone programmer" configuration which the PR2 provides, and which the PR3 and PR4 can support.
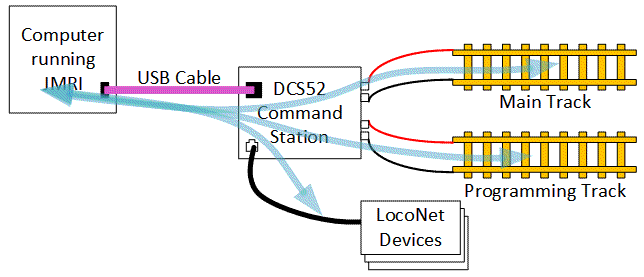
Alternately, when JMRI will be used to access LocoNet resources which go beyond simply the DCS52 programming track, then JMRI should be configured to act as a general-purpose LocoNet interface. The JMRI "connection" should be configured so that the "command station" type specifies the type of command station which is being used.
If, instead of using the DCS52's integrated USB port, you plan to connect your computer to the DCS52 using a LocoNet adapter device, follow the instructions found here.
The table below summarizes these possibilities.
| Connection Type | Usage | Settings in JMRI Connection Profile | Instructions | Available JMRI Capabilities | |
|---|---|---|---|---|---|
| System Connection | JMRI Command Station Type | ||||
| USB cable from computer to DCS52 USB connector | Decoder Programming | "DCS52 USB Interface" | "DCS52 Standalone Programmer" | Configuration help | Program decoder CVs on the dedicated programming track |
| Operate one loco on the dedicated programming track | |||||
| LocoNet Interface, Decoder Programming | "DCS52 USB Interface" | "DCS52 (Zephyr Express Command Station)" | Configuration help | Program decoder CVs on the dedicated programming track and/or the main track | |
| Control one or more locos on the main track | |||||
| Control and monitor LocoNet-connected Switches, Sensors, and Transponding | |||||
| Configure some LocoNet devices | |||||
| Control or monitor the LocoNet Fast Clock | |||||
| Update firmware on some LocoNet devices | |||||
| etc. | |||||
| LocoNet Interface, Decoder Programming | Computer Connection to something other than the DCS52 USB connector | Something other than "DCS52 USB Interface" | "DCS52 (Zephyr Express Command Station)" | Configuration help | Program decoder CVs on the dedicated programming track |
| Control one or more locos on the main track | |||||
| Control and monitor LocoNet-connected Switches, Sensors, and Transponding | |||||
| Configure some LocoNet devices | |||||
| Control or monitor the LocoNet Fast Clock | |||||
| Update firmware on some LocoNet devices | |||||
| etc. | |||||
Note that it is possible to use the DCS52 in a "booster" mode, and rely upon some other command station. If this configuration is used, the "command station" specified for the JMRI connection should match the device which is actually acting as the command station.
Choosing a configuration method
When setting up a JMRI "connection profile", which "command station" should you use when configuring JMRI? That depends on what you intend to do with JMRI.
- If you will only use JMRI to program decoders on the dedicated programming track, then configuring the connection for the "command station" type of "DCS52 Standalone Programmer" mode is a good choice. In this mode, JMRI will be able to read and write decoder CV values. In this mode, you may also use a JMRI throttle to select and control the locomotive on the dedicated programming track, subject to the ability of the DCS52 to supply sufficient current to the decoder. JMRI will not be able to access LocoNet peripherals and JMRI throttles will not be able to control decoders via the "main track".
-
If you wish JMRI to be able to control decoders via the DCS52 main track outputs, and access LocoNet devices, then configuring the connection for the "command station" type of "DCS52 Standalone Programmer" mode is a good choice. In this mode, JMRI is able to control decoders connected via the main track outputs and access LocoNet devices. JMRI may also perform decoder programming via the dedicated programming track, but JMRI throttles will not be able to run decoders which are on the dedicated programming track.
- If you think that both modes may be useful to you, you should consider setting up two configuration profiles. Then, when you start JMRI, you may select the configuration profile which suits the way you want to use JMRI. And to switch to the other mode, you may simply quit JMRI and re-start it, and select the other profile, so that you may perform the other type of work.
DCS52 USB interface as a stand-alone decoder programmer

When the DCS52 USB interface is configured to act as a programmer, it acts upon the dedicated programming track via the "programming track" connections on the DCS52. When JMRI is properly configured, JMRI can use the DCS52 programming track to access decoder CVs when the decoder is connected to the programming track.
This JMRI configuration may also be used to download sound information into Digitrax sound decoders and, within its limited current capability, run one locomotive to test it. When used with Digitrax SFX decoders, "neutral mode" allows you to vary the speed without the motor moving the decoder, so you can hear how the locomotive sound reacts to varying speeds.
In this mode of operations, JMRI will not have access to LocoNet-based devices.
Setup for the DCS52 acting as a standalone programmer
To use the DCS52 programming track, connect the DCS52 to its power supply and connect a dedicated piece of track which you'll use as the programming track to the DCS52 "programming track" terminals. Finally, connect a USB cable between the DCS52 and your computer.
To set up JMRI to use the DCS52 via the dedicated decoder programming track mode:
- Start the program.
- Open the Preferences window from the Edit menu and configure the connection by:
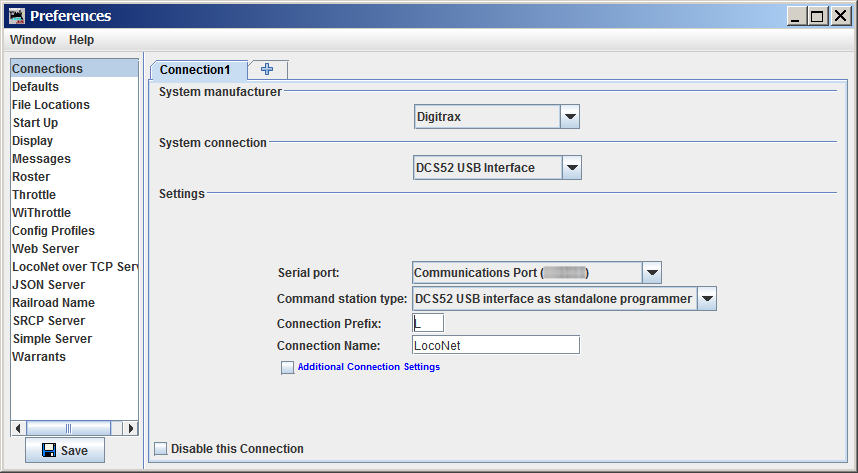
- For the "System Connection" setting, select "DCS52 USB Interface"
- Under "Serial Port", select the serial port that's connected to the DCS52
- In the "Command station type" option, select the type of command
station you've got on your LocoNet. Typically, this will be "
DCS52 USB
            Interface as standalone programmer
". - In the advanced settings, the speed will be fixed at 57,600 baud.
- In the advanced settings, the "Flow Control" option defaults to "Use Hardware Flow Control", which is the preferred setting for the DCS52. You should try that first, as it is the most reliable mode. Only if you can't reliably program decoders using that choice, and only after checking that you're using the right port, should you select "None" for this preference and try again.
- Click Save at the bottom of the preferences window, quit the program and restart.
The "connection" preferences should look similar to this image:

DCS52 USB Interface in Standalone Programming Mode Usage Hints
- You can use a JMRI throttle to control the locomotive connected to the DCS52 Programmer track. Use the JMRI Power Control or the "Power" menu item on the Throttle's menu bar to turn on track power, and then you can operate the locomotive normally via a JMRI throttle.
- The DCS52 can only provide very limited current to the programming track, so Digitrax
has built a "neutral mode" into their sound decoders. When JMRI and the DCS52 is running a
Digitrax sound decoder, the motor is disconnected to reduce the current load. You can still
ramp the speed up and down with the throttle and listen to how the sound responds, but the
motor won't move the locomotive.
- To implement that "neutral mode" described above, the DCS52 automatically writes CV128 to 0 or 1. This happens when a JMRI throttle is used to run the locomotive on the DCS52 programming track, and there's nothing JMRI can do to prevent it. Unfortunately, this can interfere with the CV programming on some non-Digitrax decoders. For example, it will set the "Master Volume" CV128 on some SoundTraxx decoders to a very low volume.
- If you are working with a decoder that uses CV128 for something, you should either not use a JMRI throttle to run the locomotive on the DCS52 programming track, or remember to rewrite CV128 with the right value just before removing the locomotive from the track.
- Other decoders, including decoders from other manufacturers, may draw enough motor current to trip the DCS52 internal circuit breakers. This will cause JMRI to mark track power as "off". Just wait a couple seconds and turn the track power back on to recover.
- If the DCS52 is in its "Decoder CV programming" mode and JMRI is used to access decoder CVs, then the DCS52 display may show programming-related information that is not strictly accurate. This is because the DCS52 cannot easily discriminate between CV accesses made via its keypad and CV accesses made via other sources.
- It is possible run trains via the DCS52 controls and/or LocoNet-based throttles when JMRI is programming a decoder on the DCS52 programming track.
DCS52 USB interface as a LocoNet Interface

When acting as an interface, the DCS52 USB connection allows JMRI to interact with devices connected to LocoNet. This includes programming decoders on a programming track attached to a LocoNet command station. Where the LocoNet command station supports "programming on the main", JMRI is able to make use of that feature.
Setup for the DCS52 acting as a LocoNet interface
To use the DCS52 USB connection as a LocoNet interface, connect a LocoNet cable to a LocoNet connector on the DCS52. Connect an appropriate power supply to the DCS52, per the Digitrax instructions for the DCS52. The DCS52 USB interface will not be able to communicate with LocoNet unless the DCS52 is properly powered. Finally, connect an appropriate USB cable between the DCS52 USB connector and your computer.
To set up a JMRI application to use the DCS52 as an interface to a LocoNet which includes a LocoNet command station:
- Start the program.
- Open the Preferences window from the Edit menu and configure the connection by:
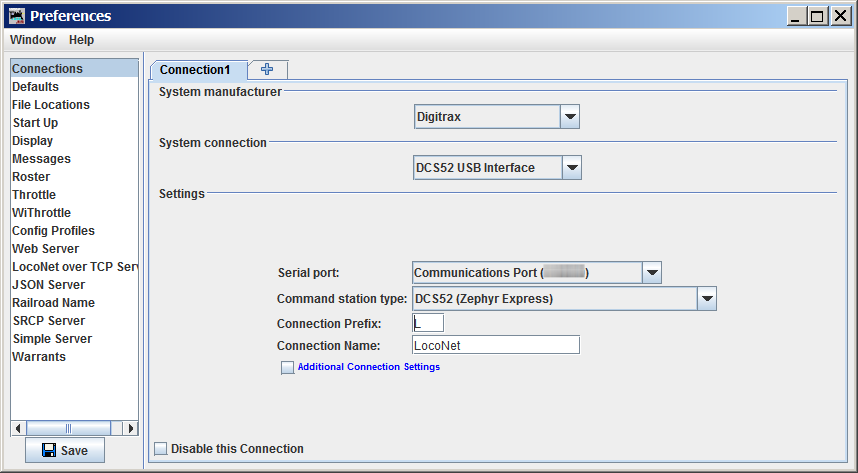
- For the "System Connection" setting, select "DCS52 USB Interface"
- Under "Serial Port", select the serial port that's connected to the DCS52
- In the "Command station type" option, select the type of command
station you've got on your LocoNet. Typically, this will be "
DCS52
            (Zephyr Express command station)
", but, if you have configured your DCS52 to act only as a booster, you should select the command station option which matches the active command station. - In the advanced settings, the speed will be fixed at 57,600 baud.
- In the advanced settings, the "Flow Control" option defaults to "Use Hardware Flow Control", which is the preferred setting for the DCS52. You should try that first, as it is the most reliable mode. Only if you can't reliably program decoders using that choice, and only after checking that you're using the right port, should you select "None" for this preference and try again.
- Click Save at the bottom of the preferences window, quit the program and restart.
The "Connection" preferences should look similar to this image:

DCS52 connected via some other LocoNet Interface

JMRI may connect to the LocoNet via a LocoNet interface other than the DCS52 USB connector. When connected in this fashion, these general instructions, or, where available, the JMRI documentation associated with the LocoNet interface which is being used.
DCS52 Drivers
The DCS52 USB interface needs to have a driver installed when used with any Microsoft Windows Operating System. See the Digitrax "Downloads" page for drivers. At the time this help page was written, Digitrax provides Windows drivers for the PR3 device. Those drivers are suitable for use with the DCS52 USB interface. Make sure to follow any instructions, particularly any instructions about the order of installing the drivers and plugging in the device.You don't need to install a separate driver when using current versions of MacOS or Linux.
See Also
- JMRI's general Digitrax support page
- The JMRI Rosters page.
- The JMRI Command Station Configuration page describes how to configure command station OpSw settings.
- For more information on the DCS52 itself, please consult the Digitrax website:
- The Digitrax DCS52 product page.
- The Digitrax DCS52 Support page.
- Drivers for Windows-based machines may be found at the Digitrax Downloads page. Note: Use the Digitrax PR3 drivers with the DCS52 USB interface.
LocoNet® is a registered trademark of Digitrax, Inc.