- Digitrax LocoNet®
-
- LocoNet Tools
- LocoNet Simulator
- Command Stations
- Programmers & Adapters
- Networking
- Technical
- Supported Hardware
- Devices, command stations, networks, and protocols:
- Anyma DMX
- Arduinos
- Atlas Commander
- Bachrus
- BiDiB
- CAN Bus Networks
- CBUS®
- C/MRI
- CTI Electronics (Acela)
- CVP EasyDCC
- Dcc4Pc
- DCC-EX EX-CommandStation
- DCC++
- DCC Specialities
- Digi XBee
- Digikeijs / YAMORC
- Digitrax
- DMX 512 (Powerline)
- ESU ECoS
- Fleischmann
- Hornby
- Insteon (Powerline)
- LCC
- Lenz
- Lionel TMCC
- LocoNet
- Maple Systems
- Märklin CS2
- MERG
- Modbus
- MQTT
- MRC
- NAC Services RPS
- NCE
- Oak Tree Systems
- OpenDCC
- OpenLCB
- Pi Engineering RailDriver
- Powerline
- Protrak Grapevine
- QSI Quantum Programmer
- Raspberry Pi
- RFID Readers
- Roco
- SPROG DCC
- SPROG DCC Generation 5
- SRCP server
- TAMS Master Control
- TracTronics SECSI
- Uhlenbrock Intellibox
- Viessmann Commander
- Wangrow System One
- WiFi Throttles
- X10 (Powerline)
- XPressNet
- Zimo MX-1
- ZTC Controls
- Applications
- By the community of JMRI.org:
- Tools
- JMRI tools for working with your layout:
- Common Tools:
- Blocks:
- Routing and Control:
- Other:
- System-specific...
- Web server tools...
- Layout Automation
- Use JMRI to automate parts of your layout and operations:
Hardware Support: Standalone LocoNet®
Contents
- Introduction
- JMRI Configuration
- Hardware Considerations
- Standalone LocoNet® Examples
- Acknowledgments
- Documentation
Introduction
A "Standalone" LocoNet® is a LocoNet bus which does not have a LocoNet command station. Since it does not have a LocoNet command station, it cannot control locomotives, and cannot directly influence the DCC track signal created by a DCC command station.
There are several situations where a standalone LocoNet bus is useful. Some of these situations are listed here:
- When using LocoNet peripherals with a non-LocoNet DCC command station.
- When using LocoNet peripherals with a non-DCC railroad.
- To isolate LocoNet peripherals from LocoNet throttle activity.
- To avoid LocoNet traffic issues associated with the Digitrax command station's small buffer for forwarding LocoNet switch commands to the DCC track signal.
- Some users even find it useful to have JMRI communicate with two or more LocoNet connections. One LocoNet connection might be a "standard" LocoNet, with a LocoNet-based command station, so that JMRI can program decoders and perhaps control mobile decoders. Another LocoNet connection could be a standalone LocoNet, with block detection, signal control, and switch control hardware monitored and controlled by JMRI. This standalone LocoNet is quite useful when implementing a CTC panel, as it ensures that the block detection and signaling cannot be influenced by throttle activity. In other words, a LocoNet throttle user might send LocoNet switch control messages, but those messages won't have any effect on the switches and/or signals which are on the standalone LocoNet.
This page gives some general suggestions for implementing a standalone LocoNet as well as suggestions for configuring JMRI software to make use of the standalone LocoNet.
JMRI Configuration
For JMRI to communicate with an independent LocoNet, the JMRI computer requires one LocoNet adapter device per independent LocoNet. Each adapter is configured on a separate JMRI "Connection" within the JMRI "Connections" tab settings under JMRI "Preferences". Each connection should be configured following the general instructions found at the JMRI Hardware Guide: Digitrax DCC page.
Except as noted below for the PR3, the JMRI connection for the
standalone LocoNet should specify the "Command Station type" of
"Stand-alone LocoNet".
A standalone LocoNet will typically not control the hardware resources associated with "throttle management", "track power management", "command station management", and will typically not provide a programming track. As such, a standalone LocoNet connection will typically not be associated with "Throttles", "Power Control", "Command Station", or "Programmer" on the "Default" pane of the JMRI "Preferences" panel.
Hardware Considerations
A "LocoNet" bus implementation which has all the electrical signaling required by all LocoNet devices requires a LocoNet-based command station, such as the Digitrax DCS100 or Digitrax DB150. Some applications do not need all of the functionality provided by the Digitrax command station. This is where the standalone LocoNet bus is useful.
Different LocoNet devices require different features of LocoNet". Key LocoNet features which are normally provided by a LocoNet-based command station include: "Slot management", "RailSync" signal, LocoNet Data signal termination, and fast clock master. The table below shows some LocoNet devices and their requirements.
| Command Stations and Boosters | ||||
|---|---|---|---|---|
| Device | Slot Management | RailSync | LocoNet Data signal termination | Fast Clock Master |
Digitrax command stations
|
Provides | Provides DCC signal | Provides | Provides |
Digitrax boosters
|
Requires DCC signal | |||
| Uhlenbrock Intellibox | Provides | Can provide DCC signal **** | Provides | ? |
| Uhlenbrock Daisy System (Daisy throttle plus Powerxx booster or Daisy II Zentrale ) |
Provides | Can provide a DCC signal * | Provides | ? |
| Non-LocoNet command station | Can provide DCC signal * | Provides? | Provides? | |
| Computer Interface Devices | ||||
| Device | Slot Management | RailSync | LocoNet Data signal termination | Fast Clock Master |
| Digitrax PR3 (in MS100 mode) | Optional | Required, can provide | ||
| Digitrax PR4 (in MS100 mode) | Optional | Requires DCC signal or simple power supply ***** | Required, cannot provide | |
| RR-CirKits LocoBuffer-USB Rev N, LocoBuffer-USB Rev O, LocoBuffer-NG |
Optional | Required for power ** | Required, cannot provide | |
| RR-CirKits LocoBuffer-II/LocoBuffer-USB | Optional | Required for power ** | Required, can provide | |
| LocoBuffer | Optional | Required, might provide *** | ||
| LocoNet Throttles | ||||
| Device | Slot Management | RailSync | LocoNet Data signal termination | Fast Clock Master |
| Digitrax DT100x/DT200x/DT300x/ DT400x/DT402x/DT500x/DT602x/UTx throttle |
Required | Optional, for power | Required | Optional |
| Some Other LocoNet Devices | ||||
| Device | Slot Management | RailSync | LocoNet Data signal termination | Fast Clock Master |
| Digitrax LNRP | Requires DCC signal | Required | ||
| Digitrax DS54/DS64/DS74/DS78V | Required if connected to LocoNet | |||
| Digitrax BDL16/BDL162/BDL168 | Requires DCC signal | Required, can provide | ||
| Digitrax BDL716 | Requires DCC signal | Required | ||
| Digitrax PM4/PM42 | Requires DCC signal | Required, can provide | ||
| Digitrax PM74 | Requires DCC signal | Required | ||
| Digitrax SE74 | Required | |||
| Digitrax UR90/UR90X/UR91/UR92/UR92CE/UR93 | Required | Required | ||
| Digitrax BXP88 | Requires DCC signal | Required | ||
| Digitrax BXPA1 | Requires DCC signal | Required | ||
| Digitrax LNWI | Required | Required | ||
| (DIY)LocoIO/LocoServo | Required | |||
| Team Digital SIC24/SIC24AD/SRC8/SRC16/SC8/CSC/BLOCD8 | Required | |||
| RR-CirKits TC-64, TC-MkII | Required for power ** | Required | ||
| RR-CirKits LNCP | Required | |||
| RR-CirKits Motorman, MotorMan-II, SignalMan, TowerMan, Watchman |
Required | |||
| RR-CirKits LocoNet-Terminator | Can provide DC power | Can provide Termination | ||
| RR-CirKits SSB-Gateway | Can provide DC power | Can provide Termination | ||
| CML Electronics DAC10, DAC20 | Required | |||
| CML Electronics SIGM10 | ? | Required | ||
| CML Electronics SIGM20, DTM30, TXC1 | Requires DCC Signal | Required | ||
| CML Electronics LocoShuttle | Provides Slot Management | Generates RailSync | Required | |
| Logic Rail Technologies LocoNet Fast Clock | Required | Required, can provide | ||
| Tam Valley Depot Quad-LN, Quad-LN-S | Required | |||
| Möllehem Gårdsproduktion (MGP) LocoNet Termination card |
Can provide DC power | Can provide Termination | ||
| N3IX RailSync Power and Termination Board | Can provide DC power | Can provide Termination | ||
Notes:
* Some circuitry may be required to generate the RailSync signals from a non-LocoNet booster. See RailSync from a non-Digitrax command station, below.
** LocoNet devices with an isolated LocoNet interfaces must take power from the LocoNet RailSync wires to power the LocoNet side of their isolation hardware. These devices may not require that the RailSync wires have a copy of the DCC track signal, but they do require sufficient voltage and current. A DC power supply, as shown below in RailSync power from a DC power supply, is sufficient to meet the power needs of the LocoBuffer-II, the LocoBuffer-USB, the LocoBuffer-USB Rev-n, and the TC-64. If the RailSync wires do not provide sufficient voltage and current, these devices will be unable to communicate reliably with LocoNet.
*** Some versions of the LocoBuffer design can provide LocoNet termination if additional components are installed on the LocoBuffer board. Other versions of the original LocoBuffer design do not have places for the additional components to be installed. These comments do not apply to the LocoBuffer-II or LocoBuffer-USB designs.
**** Intellibox documentation notes that only opto-isolated boosters may be connected to its LocoNet connection. It is unclear whether any device using the signal on the RailSync lines from the Intellibox must have opto-isolation circuitry.
***** PR4 devices require either a low-power copy of the DCC Track Signal or DC power on the "RailSync" wires. The PR4 uses the signal on the RailSync wires to power its LocoNet isolation and interface circuitry. Failure to provide sufficient power on the RailSync wires will prevent the PR4 from communicating with LocoNet or result in unreliable communication. The PR4 cannot provide LocoNet Data Signal "Termination".
LocoNet Data Signal "Termination"
"Termination" of the LocoNet Data Signal is something that allows the LocoNet data path to work. One device on LocoNet must provide this "termination" so that all LocoNet devices may communicate on the LocoNet "data" wires. Without this "termination", LocoNet devices cannot pass LocoNet messages to each other.
LocoNet Data Signal "Termination" has been called many different things. Some alternate terms are listed here. The BDL168 manual defines an OpSw setting which "Allows this BDL168 board to terminate LocoNet". The LocoBuffer-II and LocoBuffer-USB devices (except not the LocoBuffer-USB Rev-n) have a hardware jumper which allows these devices to "provide LocoNet Master termination". The PR3 has an operating mode where "The PR3 has the ability to act as a LocoNet terminator." All of these are describing the term used in this document, LocoNet Data Signal Termination.
Some commercial hardware which can provide LocoNet Data signal termination
-
BDL16, BDL162, BDL168
The instructions in the BDL16x manual includes a section on how to use the BDL168x with a non-Digitrax layout. This section mentions setting one of the BDL16x boards to act as a LocoNet master by properly configuring a BDL16x OpSw. Doing this can set the BDL16x board to provide LocoNet Data signal termination, and to act as a LocoNet Master.
The BDL16x board provides two ways to configure a BDL16x board to provide LocoNet Data Signal Termination. One mechanism is only usable when the BDL16x is connected to a LocoNet which has LocoNet Data Signal Termination from some other source, and requires use of some other device to send LocoNet switch commands to the BDL16x. The other mechanism does not require a functioning LocoNet.
- When using a functioning LocoNet to configure a BDL16x to provide LocoNet Data Signal Termination, it is necessary to provide power to the BDL168 through its edge connector, and to connect it to a functioning LocoNet. Then place the BDL16x into its OpSw mode (see BDL16x documentation), and use a throttle or computer or other device to send a switch command to "Close" OpSw 12. Then return the BDL16x to normal operating mode (as described in the BDL16x documentation). If you will have multiple BDL16x boards connected to your standalone LocoNet, or to avoid sensor address conflicts with other devices which implement sensor messages, it is a good time to change the BDL16x board's BDL168's Board Address (also called Board ID). Follow the instructions in the BDL16x documentation for this.
- If a functioning LocoNet is not available, use the "pushbutton" mechanism to
configure the BDL16x board for either "direct home" layout wiring or "common rail"
layout wiring, as described in BDL16x documentation. When this is done, the following
BDL16x OpSw values are forced:
- BDL16x OpSw11 is forced to "c", which forces the BDL16x to act as a LocoNet "master".
- BDL16x OpSw12 is forced to "c", which forces the BDL16x to provide LocoNet Data Signal Termination.
- Depending on which button is used with this mechanism, BDL16x OpSw1 is forced either to "t" for "direct home" layout wiring or to "c" for "common rail" layout wiring.
Once you have established a functioning standalone LocoNet, additional BDL16x boards can be added. Each should have its own Board ID (Board Address) number so that BDL16x sensor numbers do not overlap sensor numbers for other boards or sensor numbers used by other devices on the standalone LocoNet.
-
The PR3 provides two different operating modes which may be useful when the PR3 is used to interface to a standalone LocoNet. One useful mode provides LocoNet Data Signal "Termination" in its MS100 mode, while the other mode does not provide LocoNet Data Signal termination.
-
For the case where the PR3 must provide LocoNet Data Signal "Termination", and where the PR3 is connected to a suitable live power source via its "Power" jack, JMRI should be configured in a way which will automatically set the PR3 to its "MS100 mode with termination" mode at JMRI program start-up time. This can be accomplished by configuring the JMRI connection settings for the PR3 so that the "
Command Station type:" is set to "Stand-alone LocoNet; interface device 'terminates' the LocoNet Data signal" (currently the Terminate option is not available)Note that this PR3 operating mode is not recommended when there is some other source of "LocoNet Data Signal Termination" connected to LocoNet, and it is not suitable when the PR3 is not provided suitable power via its "Power" barrel jack.
-
If, instead, the PR3 will be connected to a LocoNet where some other device provides LocoNet Data Signal "Termination", then it is more appropriate to use the PR3 in its MS100 mode without enabling the PR3's Data signal termination feature. In this case, it is appropriate to configure the PR3 connection for a "
Command Station type:" of "Stand-alone LocoNet; interface device does not 'terminate' the LocoNet Data signal" (currently the Terminate option is not available)
-
-
LocoBuffer-II, LocoBuffer-USB (revisions before Rev N)
See the instructions for the appropriate hardware for the required switch and/or jumper settings. These devices power their LocoNet data signal termination using power provided by the LocoNet RailSync wires.
-
LocoBuffer
Some versions of the original LocoBuffer design allow the builder to add components to provide LocoNet Data signal termination. Consult your LocoBuffer documentation to determine whether your hardware can provide LocoNet Data signal termination.
-
RR-CirKits LocoNet-Terminator
This device may be configured to provide LocoNet Data Signal termination. It may also be configured to provide DC power on the RailSync wires.
-
RR-CirKits SSB-Gateway
This device may be configured to provide LocoNet Data Signal termination. It may also be configured to provide DC power on the RailSync wires.
-
Möllehem Gårdsproduktion LocoNet Termination card
This device may be configured to provide LocoNet Data Signal termination. It may also be configured to provide DC power on the RailSync wires.
-
N3IX RailSync Power and Termination Board
This device may be configured to provide LocoNet Data Signal termination. It may also be configured to provide external DC power on the RailSync wires for both of its LocoNet connectors. Alternatively, it may be configured to provide external DC power only to one of the two LocoNet ports, allowing the device to provide an external power source in cases where there is too much RailSync loading on a portion of the LocoNet and where portion does not need an active RailSync signal.
Do-it-yourself LocoNet Data Signal Termination
LocoNet cannot operate without "LocoNet Data Signal termination". When using a PR4, a LocoBuffer-USB Rev N, a LocoBuffer-USB Rev O, or other LocoNet interface device which cannot provide LocoNet Data Signal termination, you must provide some other device which can provide that termination. Several common LocoNet devices are able to provide this function, as shown in the table at the beginning of this page. If you are not using any LocoNet device which can provide that termination, you will need to provide it as a do-it- yourself project. Such a do-it-yourself LocoNet Data Signal Termination will typically be implemented in a way that is similar to the diagram here:
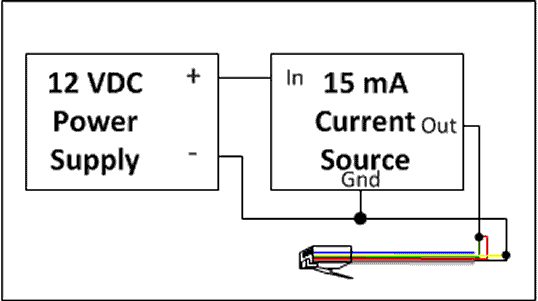
The 15 mA current source block in the diagram above may be implemented in a wide variety of ways. As an example, Dick Bronson shows a circuit for a 15 mA current source that can be used to provide LocoNet Data Signal termination at his RR-CirKits website on the Notebook page for Standalone LocoNet. Look for the section titled "Pull Up" which shows a circuit using two 2N2222 NPN transistors and two resistors. The circuit node shown as LN should be connected to the LocoNet "Data" pins - pins 3 and 4 (typically the red and green wires), as is shown in the diagram above for the "Out" connection of the current source.
Dick's circuit should be powered by a 12VDC regulated power supply capable of providing at least 15mA. The power supply negative terminal should be connected to the LocoNet "Ground" pins - pins 2 and 5 (typically the yellow and black wires). This power supply can be used to power other devices so long as they either have no electrical path back to any LocoNet wire, or so long as they connect the power supply negative terminal directly to the LocoNet "Ground" pins.
Other Internet resources may show circuits for LocoNet termination.
Technical information about LocoNet Data Signal "Termination"
Technically, the term "termination" can be somewhat misleading. For our purposes, LocoNet data signal "termination" is a current source which provides a positive 15 mA current source from a +12V supply, and which is connected to the LocoNet "Data" pins (pins 3 and 4), and which is referenced to the LocoNet "Ground" pins (pins 2 and 5). This provides a "pull-up" for the "wired-or" signaling used on the LocoNet "data" wires.
Some Digitrax documentation describes devices which can act as the LocoNet "master", and other Digitrax documentation describe the "LocoNet Master" as (in part) the LocoNet device which provides the current source for the LocoNet data lines. So, the term "LocoNet Master" may sometimes imply a device which can provide the LocoNet Data signal termination.
In this context, "data signal termination" does not refer to "electrical transmission line termination". According to Digitrax documentation, there should not be any need to provide "electrical transmission line termination" on the LocoNet data signal.
LocoNet RailSync Signal "Generation"
As shown in the table above, some LocoNet devices require that the RailSync wires on the LocoNet cable are powered or are an accurate representation of the DCC track signal. In cases where the standalone LocoNet needs only to provide power to LocoNet devices on the standalone LocoNet, a simple power supply which provides about 1 Amp at 12VDC is sufficient. In other cases, one or more LocoNet device requires an accurate representation of the DCC track signal on the standalone LocoNet cable.
Some commercial hardware which can provide DC power to the LocoNet RailSync wires
-
RR-CirKits LocoNet-Terminator
This device may be configured to provide DC power on the RailSync wires. It may also be configured to provide LocoNet Data Signal termination.
-
RR-CirKits SSB-Gateway
This device may be configured to provide DC power on the RailSync wires. It may also be configured to provide LocoNet Data Signal termination.
-
Möllehem Gårdsproduktion LocoNet Termination card
This device may be configured to provide DC power on the RailSync wires. It may also be configured to provide LocoNet Data Signal termination.
-
N3IX RailSync Power and Termination Board
Among other options, this device may be configured to provide DC power on the RailSync wires. It may also be configured to provide LocoNet Data Signal termination.
RailSync power from a DC power supply
For cases where the standalone LocoNet does need to provide power to the RailSync lines but does not need to provide a low-power version of the DCC track signal, a simple power supply connected to the LocoNet RailSync and "Ground" wires is sufficient. The diagram below shows such a circuit.
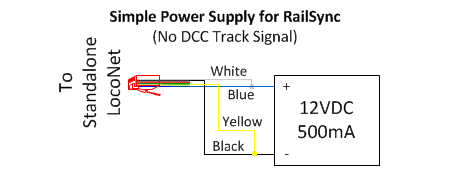
Notes:
- The power supply shown above must not be used to provide power to any other devices except via the standalone LocoNet RailSync wires. This restriction prevents the possibility of unintended current paths which could cause damage to the power supply, LocoNet wiring, or the other device(s) on LocoNet.
- This circuit must not be used in conjunction with any other device or circuit which actively puts a signal on the standalone LocoNet RailSync wires.
RailSync from a Digitrax command station
If the Digitrax command station's LocoNet "Ground" wire can be safely connected directly to the standalone LocoNet "Ground" wire, it is sufficient to connect the Digitrax Command Station RailSync+, RailSync-, and "Ground" wires to the comparable wires on the standalone LocoNet.
Do not make any connections between the standalone LocoNet's red or green wires and any wire on the command station's LocoNet. Doing so would make the standalone LocoNet just another part of the primary LocoNet.

Note that this circuit must not be used in conjunction with any other device or circuit which actively puts a signal on the standalone LocoNet RailSync wires.
If there is any concern about sneak paths between the power supply for the Digitrax command station and the standalone LocoNet, then some sort of isolation must be provided. Isolation of this nature is beyond the scope of this documentation; opto-isolators could be used for this purpose.
RailSync from a non-Digitrax command station
The Digitrax BDL16x manual gives recommendations for providing a "RailSync+" signal from the "Rail A" output of a non-Digitrax DCC booster. This instruction assumes that you have or will implement the wiring shown for "direct home wiring" or "whole layout common rail wiring" as shown in a previous diagram. The important points to remember are that the BDL16x board requires that it receive the "Rail A" signal on its RailSync+ input (on the LocoNet jack), that the BDL16x be wired in series on the "Rail A" side of the track connection, and that there is a "booster ground" connection to the BDL16x board pin 11. If the "booster ground" connection is not made, the BDL16x detection will not work properly.
Additionally, it may be advisable to provide some current limiting device, such as a series resistor, between the booster Rail A connection the RailSync+ wire on the standalone LocoNet.
While this may be suitable for BDL168 operation, other LocoNet devices may require both a RailSync+ and RailSync- signal. In this case, connections from Rail A to RailSync+, and from Rail B to RailSync- may be appropriate. Again, current limiting resistors may be advisable.
Note that this type of circuit must not be used in conjunction with any other device or circuit which actively puts a signal on the standalone LocoNet RailSync wires.
To avoid the possibility of "sneak paths" between the non-Digitrax booster and the stand-alone LocoNet, opto-isolation may be advisable. For "common rail" wiring, opto-isolation is required, as shown in the BDL168 manual diagram showing "common rail wiring". Some booster manufacturers only offer opto-isolated boosters, and some other booster manufacturers offer some models which include optical isolation.
RailSync from an NCE command station
NCE has recommended at least two different ways to use NCE Control Bus signals to create RailSync+ and RailSync- for use by Digitrax Boosters. The diagram below, based on one shown in an NCE document, shows what is believed to be a good way to do this.
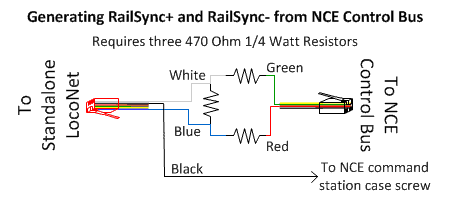
Notes:
- These types of circuits must not be used in conjunction with any other device or circuit which actively puts a signal on the standalone LocoNet RailSync wires.
- Another NCE document shows a diagram without any resistors, and with the relationship between NCE Control+/- and RailSync+/- wires swapped, but it does not mention any connection to the LocoNet black wire. It is believed that such a circuit might work but would be more sensitive to electrical noise than the circuit shown above.
BDL16x connection to a DCC system without a "Ground" terminal
According to BDL16x documentation, proper BDL16x operation requires a "ground" connection to the DCC booster, via pin 11 on the BDL16x connector. But some boosters do not have any documented "ground" connection.
The following circuit has been used to allow connection of a BDL16x for occupancy detection with the Hornby Elite DCC system, which does not have a "ground" connection. This circuit creates a "pseudo-ground" from the DCC track signal which can be used as the "Ground" for the connection to the BDL16x.
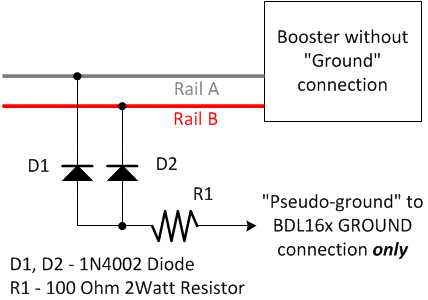
Note that this "pseudo-ground" should only be connected to BDL16x devices.
Multiple active LocoNet connections
When a JMRI profile is configured for more than one active LocoNet connection, JMRI treats each active LocoNet connection as if it is connected to an independent LocoNet. When JMRI sends a message to LocoNet, it will send only to one of those LocoNet connections, depending on how that LocoNet traffic is generated within JMRI.
Routing LocoNet messages to a LocoNet connection based on "Connection Prefix"
Each active LocoNet connection within a given JMRI profile has a unique "Connection Prefix" as well as a unique "Connection Name". For each active LocoNet connection, the main window of the JMRI tool will show one pull-down menu for each active LocoNet connection, where each pull-down menu item, and each is named for the "Connection Name" assigned in the connection.
When using a tool from a given LocoNet pull-down menu, the tool will direct its LocoNet messages to the hardware interface associated with the "Connection Name" shown as the pull-down menu name.
For example, consider a JMRI profile with three active LocoNet connections, named "LocoNet", "LocoNet2", and "LocoNet3". If one opens up the "Configure Command Station" tool in the "LocoNet2" menu, the LocoNet messages related to that tool window will be sent to and received from the hardware connection which is configured with the connection name "LocoNet2". The tool will not send its messages to the hardware connections related to the connections with Connection Names "LocoNet" and "LocoNet3", and the tool will not pay attention to traffic received by JMRI via the hardware connections associated with the "LocoNet" and "LocoNet3" connections.
Routing LocoNet messages to a LocoNet connection based on "Connection Name"
Similarly, when JMRI works with a resource that is defined using a "Connection Prefix", it will work with the hardware connection associated with that "Connection Prefix", and it will not attempt to work with a resource which has the same resource number but with a different "Connection Prefix".
As an example, if JMRI attempts to control L3T45, it will send its turnout control message to the hardware interface associated with the connection prefix "L3", but will not send control messages to the hardware associated with connection prefix "L" or to the hardware associated with connection prefix "L2". Similarly, messages on the hardware connection associated with connection prefix L3 will have an effect on JMRI's interpretation of the state of L3S512, while LocoNet messages on the hardware connections associated with connection prefix L and connection prefix L2 will not affect JMRI's interpretation of the state of L3S512.
Routing LocoNet messages to a LocoNet connection based on "Default" settings
JMRI allows the user to to configure how some of the JMRI tools route their messages to the various connections by default. This configuration is done via the profile's "Preferences", in the "Defaults" configuration tab. These settings force the JMRI tools to assume that certain operations will be directed to certain hardware connections, unless the tool allows a specific interface to be selected using a "Connection Prefix" or some other tool-specific mechanism.
For example, some JMRI users will have a PR3/PR4 connection for mobile decoder programming, and another LocoNet connection for communicating with the command station, turnouts, throttles, etc. In this case, the "Defaults" settings would configure the hardware connection associated with the PR3/PR4 programming track as the "Programmer" connection, while the other LocoNet connection would be configured as the communications path for "Throttles", "Power Control", and "Command Station".
Multiple active LocoNet connections to a single LocoNet
JMRI is designed upon the assumption that each of JMRI's LocoNet hardware connections are connected to independent LocoNet busses. If the user has connected the LocoNet cabling so that more than one JMRI LocoNet hardware interface connects to the same LocoNet, then LocoNet traffic seen on one connection will be seen on the other connected LocoNet hardware connection(s).
As an example of this, consider a JMRI profile which configures three active LocoNet connections, with connection names "LocoNet", "LocoNet2", and "LocoNet3". Assume that the first and second of these are connected to the same LocoNet, while "LocoNet3" is connected to an independent LocoNet. If JMRI sends a Switch control message to LT604, JMRI will "see" that switch control message as a change to L2T604 when the second LocoNet hardware interface sees the message sent by the first LocoNet hardware interface. But L3T604 will not be changed, because LocoNet3 is an independent LocoNet implementation in this example, so it would not see the traffic generated by JMRI when controlling LT604.
Note that this type of connectivity can cause difficulty with the JMRI turnout retry mechanism for any active LocoNet which is connected to a LocoNet-based command station, as described in Command Station Turnout Command Rejection and JMRI Turnout Command Handling.
"Sneak paths" and Computer Interfaces
When multiple devices share different types of electrical connections, unexpected current paths can be present that can cause malfunction or component failure. A properly designed and implemented system prevents these problems.
A good example of this type of problem is the connectivity that begins at the (power receptacle) wall outlet, through power supplies, boards, interface devices and computers. If there is "electrical connectivity" between the wall outlet and the output of a power supply, and the power supply is electrically connected to a board such as a BDL16x, and the board is electrically connected to a LocoNet bus, and the LocoNet bus is electrically connected to a computer interface, and the computer interface is connected to a personal computer, and the personal computer is connected to a power supply, and the power supply is connected to the wall outlet, there could be a "sneak path" for electrical current around the electrical connectivity loop. If the electrical current happens to exceed the ratings of any component in the loop, there can be a failure of that component, and perhaps components to which it is connected.
How can such a problem be avoided? By careful planning of the electrical connectivity within a system, and inclusion of some form of "isolation" where electrical connectivity concerns arise. It is usually very difficult to determine the electrical connectivity within a computer power supply, so it is generally a good idea to isolate the computer from the remainder of the system.
Isolation of LocoNet from the computer is recommended. The LocoBuffer-II, LocoBuffer-USB, LocoBuffer-USB Rev-n and LocoBuffer-NG, and the Digitrax PR4 computer interface devices provide "optical isolation" of the LocoNet signals from the computer electrical signals. Note that the LocoBuffer-II isolation is not effective when it is configured for "Local Power". The LocoBuffer-II should be configured for "isolated power" and should have an external power supply plugged in for proper operation and isolation.
Other computer interfaces can be isolated using 3rd-party isolation devices. Placing a USB hub with optical isolation between the computer and the USB device, or an RS232 optical isolation device between the computer and the RS232-based interface device might provide a safe and functional solution. Note, though, that some users have reported issues when using a USB hub (whether optically isolated or not) with the PR3/PR4.
Similar "sneak path" problems can happen when sharing a single power supply for multiple device types that share other connectivity. A LocoNet cable can provide that "other connectivity", so devices which connect to LocoNet must be powered with care. A safe "general rule" is that a power supply should be connected to, at most, one type of board.
Standalone LocoNet® Examples
Isolating the LocoNet throttle bus from LocoNet Turnouts, Detection & Signaling
The diagram below shows an example with a LocoNet-based command station and throttles on a "primary" LocoNet, and a standalone LocoNet which provides block detection, signal control, and control of switches. In this example, devices on the "primary" LocoNet, including throttles, cannot directly control switches or signals on the standalone LocoNet.
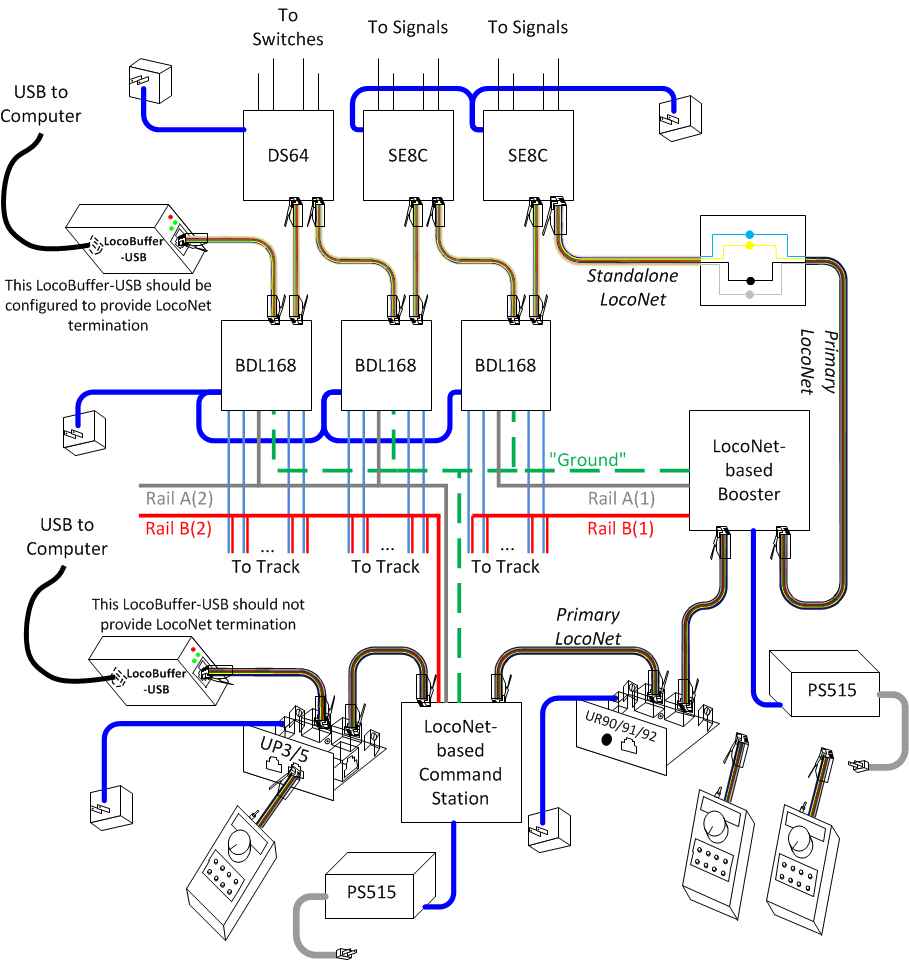
JMRI signal control logic can interpret the LocoNet block occupancy report messages generated by the BDL168s, and can control signal aspects by generating appropriate LocoNet messages to the SE8Cs. JMRI can also control switches connected to the DS64. This type of connectivity may be useful when JMRI is used to implement a CTC panel.
For the connectivity shown in this diagram, the standalone LocoNet data wires are not connected to the primary LocoNet, so LocoNet Master termination cannot be provided by the command station. An alternative source of LocoNet Data Signal Termination must be used. The LocoBuffer-USB (except not LocoBuffer-USB Rev-n) can easily be configured to provide "LocoNet Master termination" via an internal jumper setting (see the LocoBuffer-USB User's Manual). Alternate sources of LocoNet Data Signal Termination are described above.
With the connectivity shown in the diagram above, the DS64 does not get its switch commands from DCC track power. This is an intentional choice. Connecting DS64s so that they do not get track power can help avoid some DS64 instability which has been reported by some users. Instead, the DS64 gets its power from an external power supply, and gets its switch control commands from LocoNet.
This diagram assumes that there are no sneak current paths between any device associated with the standalone LocoNet and any device associated with the primary LocoNet. This allows connection of the Digitrax command station's LocoNet "Ground" wire to the standalone LocoNet "Ground" wire. It also shows the use of two LocoBuffer-USB devices as computer interfaces. These devices provide optical isolation of the signaling between the "computer" side of the device and the "LocoNet" side of the device, which eliminates "sneak current paths" between each LocoNet and the computer. If one or more LocoNet interface device is used which does not provide isolation, then there is a possibility that "sneak current paths" could be present. See "Sneak paths" and Computer Interfaces, above, for more information.
Switches (DS64), Detection (BDL168) and Signals (SE8C) with non-Digitrax DCC command station
The diagram below shows a possible implementation of a standalone LocoNet for computer-controlled signaling using Digitrax BDL168 boards for occupancy detection, Digitrax SE8C boards for driving signals, and Digitrax DS64s for controlling switches. For this example, one of the BDL168 boards should be configured to provide LocoNet data signal termination.
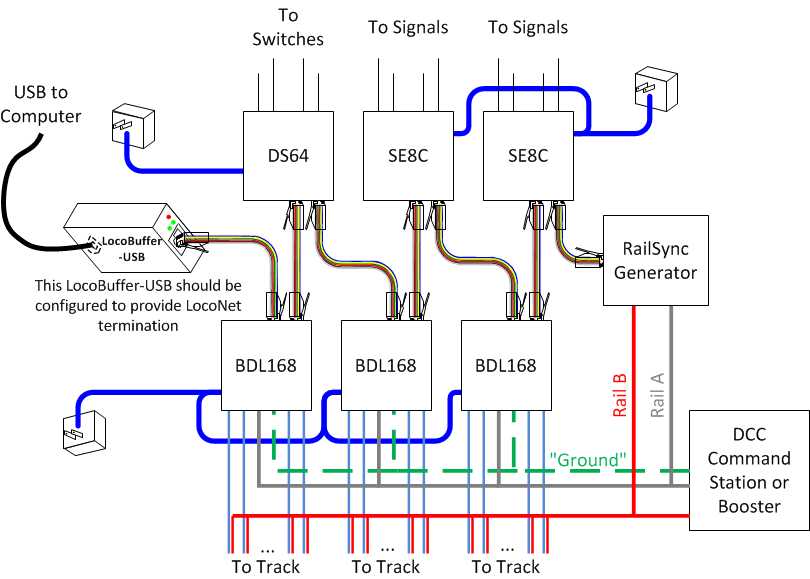
JMRI signal control logic can interpret the LocoNet block occupancy report messages generated by the BDL168s, and can control signal aspects by generating appropriate LocoNet messages to the SE8Cs. JMRI can also control switches connected to the DS64. This type of connectivity may be useful when JMRI is used to implement a CTC panel.
The RailSync Generator block should be implemented as described in RailSync from a non-Digitrax command station.
For the connectivity shown in this diagram, the DS64 should be configured to take its switch control messages from LocoNet instead of from its DCC track inputs. This should avoid some reported instability of DS64s when connected to the DCC track signal.
This diagram assumes that an isolated computer interface is used to prevent "sneak current paths" between the standalone LocoNet and the computer. If one or more LocoNet interface device is used which does not provide isolation, then there is a possibility that "sneak current paths" could be present. See "Sneak paths" and Computer Interfaces, above, for more information.
SE8C signaling without a Digitrax command station
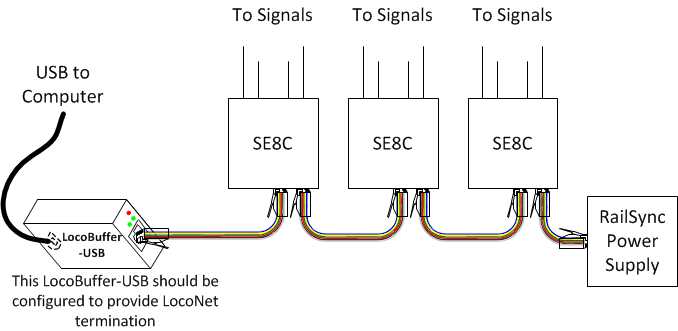
The diagram below shows a possible implementation of a standalone LocoNet for computer-controlled signaling using Digitrax SE8C boards. The example assumes that any detection information on the standalone LocoNet is not gathered from a device connected to the standalone LocoNet which would require a copy of the DCC track signal on the standalone LocoNet RailSync+/- wires. Because this standalone LocoNet does not require active RailSync+/- signals, there is no need for a connection to the booster track outputs. But the LocoBuffer-USB requires RailSync power when it is in its LocoNet termination mode, so a RailSync power supply is shown.
The RailSync power could be supplied by a do-it-yourself supply as described in RailSync power from a DC power supply above, or via a commercial device which can supply DC power to the standalone LocoNet RailSync wires, such as the RR-CirKits LocoNet-Terminator or SSB-Gateway products.
Acknowledgments
Among others, Elmer McKay and Dick Bronson have provided significant input to the content of this page. Thank you!
Documentation
Third Party info
Information and support for Digitrax products may be found at the Digitrax website.
Information and support for the LocoBuffer-II, the LocoBuffer-USB, the LocoBuffer-USB Rev-N and Rev-O, the LocoBuffer-NG, the LocoNet-Terminator, the SSB-Gateway, and other products by RR-CirKits may be found at the RR-CirKits website.
Information and support for products from Team Digital may be found at the Team Digital website.
Information and support for the Logic Rail Technologies LocoNet Fast Clock may be found at the Logic Rail Technologies website.
Information and support for products by CML Electronics is now provided by Sig-naTrak® by GFB Designs at the Sig-naTrak® website.
Information and support for products by Tam Valley Depot may be found at the TAM Valley Depot website.
Information and support for products by Möllehem Gårdsproduktion MGP) may be found at The Möllehem Gårdsproduktion website.
Information and support for products by N3IX) may be found at The N3IX Engineering website.
LocoNet® is a registered trademark of Digitrax, Inc.