- Supported Hardware
- Devices, command stations, networks, and protocols:
- Anyma DMX
- Arduinos
- Atlas Commander
- Bachrus
- BiDiB
- CAN Bus Networks
- CBUS®
- C/MRI
- CTI Electronics (Acela)
- CVP EasyDCC
- Dcc4Pc
- DCC-EX EX-CommandStation
- DCC++
- DCC Specialities
- Digi XBee
- Digikeijs / YAMORC
- Digitrax
- DMX 512 (Powerline)
- ESU ECoS
- Fleischmann
- Hornby
- Insteon (Powerline)
- LCC
- Lenz
- Lionel TMCC
- LocoNet
- Maple Systems
- Märklin CS2
- MERG
- Modbus
- MQTT
- MRC
- NAC Services RPS
- NCE
- Oak Tree Systems
- OpenDCC
- OpenLCB
- Pi Engineering RailDriver
- Powerline
- Protrak Grapevine
- QSI Quantum Programmer
- Raspberry Pi
- RFID Readers
- Roco
- SPROG DCC
- SPROG DCC Generation 5
- SRCP server
- TAMS Master Control
- TracTronics SECSI
- Uhlenbrock Intellibox
- Viessmann Commander
- Wangrow System One
- WiFi Throttles
- X10 (Powerline)
- XPressNet
- Zimo MX-1
- ZTC Controls
- Applications
- By the community of JMRI.org:
- Tools
- JMRI tools for working with your layout:
- Common Tools:
- Blocks:
- Routing and Control:
- Other:
- System-specific...
- Web server tools...
- Layout Automation
- Use JMRI to automate parts of your layout and operations:
Hardware Support: SPROG
Supported Hardware
Computer Interfaces
JMRI supports the SPROG both as a Decoder Programmer, and as a mini-Command Station. For more information on these capabilities, see the SPROG manual on the SPROG website.Note that there are several different versions of the SPROG hardware, and even more
versions of the SPROG software.
The following SPROG models operate with the current version of JMRI:
- SPROG II
- SPROG II USB
- SPROG 3 (USB)
- SPROG Nano (only as Command Station, using an external Booster)
- Pi SPROG One
- Pi SPROG Nano
Connecting
Wiring
Original SPROGs were connected via a 9-pin serial cable.
Current SPROGs are available as USB only.
Connect your SPROG using the appropriate cable and power it up.
Settings
- USB Drivers
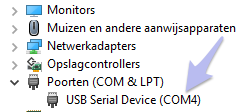
- On Windows 10 USB-connected SPROGs will work using the standard USB drivers
installed in the OS. When you plug in the SPROG, it will show up under Hardware like
this:

If you previously installed some special USB driver, uninstall it on Windows 10 before proceeding. - On Windows 7 and earlier users may need to have a driver installed. For more
information on that, see the SPROG manual on the
SPROG website.
Windows 7 users may also be interested in this video. - On macOS no USB drivers for SPROG need to be installed to use the SPROG IIv3, SPROG IIv4, SPROG3 or SPROG Nano. They comply to USB CDC (Communications Class Device) and use the default drivers included with macOS.
- For Linux, there are many variations of Linux system installations, and variations in installing the USB support may be encountered, but in general USB CDC devices are supported directly.
- On Windows 10 USB-connected SPROGs will work using the standard USB drivers
installed in the OS. When you plug in the SPROG, it will show up under Hardware like
this:
- Make sure you have the latest version of JMRI. Start one of the JMRI applications.
- Go to the Connections tab of the JMRI Preferences pane. This opens automatically the first time a program is run, or you can select it from the "Edit" menu.
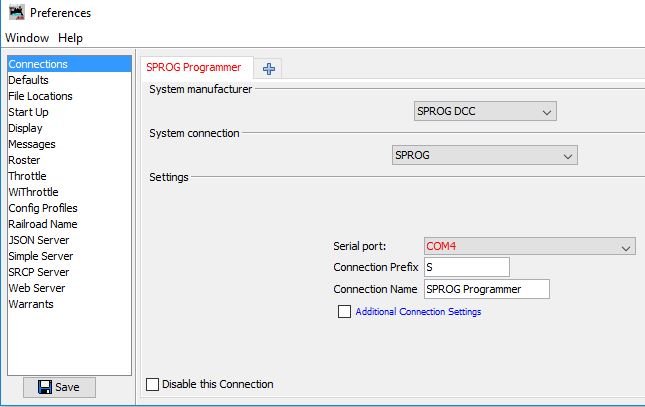
- Select "SPROG DCC" from the list as the System Manufacturer.

- Next, select one of the available System Connection options;
SPROG can either function as a stand-alone Decoder Programmer interface, or it can be set to act as a mini-Command Station for running trains.
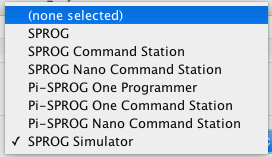
Once you select and save your choice, JMRI configures the necessary options in the SPROG.- For Programmer operation, select either "SPROG" or "Pi-SPROG One Programmer" as the
System Connection, as illustrated:

In this mode, the Status Bar along the bottom of the DecoderPro Roster pane will show the inactive function in red, like this:

If both of the left hand fields display in red type, you may have selected the wrong SPROG System Connection.
- For Command Station operation, select one of the "... Command Station" choices.
- To use JMRI without a physical SPROG connected, select "SPROG Simulator". The Simulator will mimic basic operation as either a Programmer (default) or a Command Station. You can set the mode under Additional Connection Settings.
- For Programmer operation, select either "SPROG" or "Pi-SPROG One Programmer" as the
System Connection, as illustrated:
- Next, under Settings select the appropriate serial port, except for the Simulator. Note
that the USB SPROG drivers will appear in the list as a serial port, like
cu.usbmodem1411. - Accept the suggested Connection Prefix and Name, or replace it with a more fitting one. Make sure it is unique.
- Click "Save". You'll be asked if it's OK for the program to restart, click "Restart" or "Later".
- After restart of JMRI you should be up and running with the new connection.
Configuring SPROG
SPROG uses a "Mode Word" to set a number of optional operating modes.
In all recent SPROGs, the default value for the Mode Word is correct for both programmer and command station modes. For older SPROGs you may wish check or modify the Mode Word as follows:
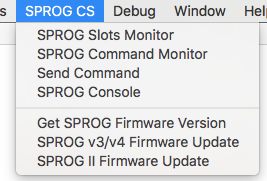
Open the Command Monitor and the Send Command tools from
the SPROG menu. Send an "M" command using the Send Command pane.
You should see a reply in the Command Monitor window, something like:
P>M=h800
The h prefix indicates a hexadecimal value. If the value you see is
different, then it should be changed by sending the command "M h800". Follow this with the
command "W" to save the change in SPROG's EEPROM memory so that it is effective each time you
power up the SPROG. Otherwise, the new value will be lost when you power off the SPROG.
Please do not be tempted to experiment with other Mode Word values as this could result in
erratic behavior of your SPROG.
Identifying your SPROG Firmware Version
Open the SPROG Console tool pane from the SPROG menu and send a "?" command.
You should see a reply appear in the Command History, something like:
SPROG II USB Ver 2.3

        P>
JMRI SPROG Tools

The following tools are available from the SPROG menu when this connection is active:
SPROG Slots Monitor
(Slots Monitor is not avalable while the SPROG is operating as a Programmer.)SPROG Command Monitor
Send Command
SPROG Console
SPROG Firmware Version
Firmware Update
SPROG includes a "Firmware Update" tool that allows the SPROG firmware (the internal
software that operates the SPROG) to be updated by the user. The update tool.
supports USB SPROG II (from version 2.2), SPROG 3 (all versions) and Pi-SPROG One (from
version 2.5). For more information contact the manufacturer SPROG DCC
Documentation
Third Party info
For more information on the SPROG, see the SPROG website.
They have a useful FAQ page.
There's a SPROG User Group at https://groups.io/g/sprog-dcc/topics.
A Dutch-language SPROG Beginner's Manual is available as a PDF from Domburg Train Support.