- Supported Hardware
- Devices, command stations, networks, and protocols:
- Anyma DMX
- Arduinos
- Atlas Commander
- Bachrus
- BiDiB
- CAN Bus Networks
- CBUS®
- C/MRI
- CTI Electronics (Acela)
- CVP EasyDCC
- Dcc4Pc
- DCC-EX EX-CommandStation
- DCC++
- DCC Specialities
- Digi XBee
- Digikeijs / YAMORC
- Digitrax
- DMX 512 (Powerline)
- ESU ECoS
- Fleischmann
- Hornby
- Insteon (Powerline)
- LCC
- Lenz
- Lionel TMCC
- LocoNet
- Maple Systems
- Märklin CS2
- MERG
- Modbus
- MQTT
- MRC
- NAC Services RPS
- NCE
- Oak Tree Systems
- OpenDCC
- OpenLCB
- Pi Engineering RailDriver
- Powerline
- Protrak Grapevine
- QSI Quantum Programmer
- Raspberry Pi
- RFID Readers
- Roco
- SPROG DCC
- SPROG DCC Generation 5
- SRCP server
- TAMS Master Control
- TracTronics SECSI
- Uhlenbrock Intellibox
- Viessmann Commander
- Wangrow System One
- WiFi Throttles
- X10 (Powerline)
- XPressNet
- Zimo MX-1
- ZTC Controls
- Applications
- By the community of JMRI.org:
- Tools
- JMRI tools for working with your layout:
- Common Tools:
- Blocks:
- Routing and Control:
- Other:
- System-specific...
- Web server tools...
- Layout Automation
- Use JMRI to automate parts of your layout and operations:
Hardware Support: BiDiB Signal Masts
(german version here)This page describes JMRI's support for BiDiB-native Signal Masts. It's part of JMRI's documentation of its BiDiB support.
BiDiB Signal Masts
Adding and Editing BiDiB Signal Masts
Initially there were (and are) signal heads in JMRI, where you define individual lamps, which in turn control "turnouts", to which BiDiB ports can then be assigned.
In BiDiB, however, accessories are provided for signals that can not only be turned on and off, but also have a number of "aspects" and macros can be used to set which lamps should light up for a specific aspect. In addition, with Accessories the transfer to the hardware is secured using confirmation messages. The programming of such accessories and macros can be done with the BiDiBWizard, please read the documentation there.
In JMRI, "signal masts" were then invented, which represent their own object, although the system name is specified by JMRI, but contains a connection-specific address in brackets (a connection is the link to the respective hardware, you could also say "driver"). This means that explicit support for BiDiB has to be provided. There is an extra SignalMast object "BiDiB Accessory Aspect" that supports a BiDiB accessory.
So how do you set up a signal mast? Open the "Signal Masts" table under Tools->Tables and click "Add" at the bottom right.
User name can be freely selected, a signal system must be selected (DB-HV-1969 in this case), as this defines the aspects of the signal. This creates a list in Mast Type that represents the signal types in the signal system. In this case the signal type is an exit signal with a distant signal. Of course, "BiDiB Accessory Aspect" must be selected as the Mast Driver, the connection is BiDiB and the BiDiB address of the accessory is set under Accessory Address, as is known from the other objects, in this case it is Accessory 3 at a BiDiB node with the Username "N210" (you can also explicitly write "N210:a3", but for nodes that have accessories, "a" is default).
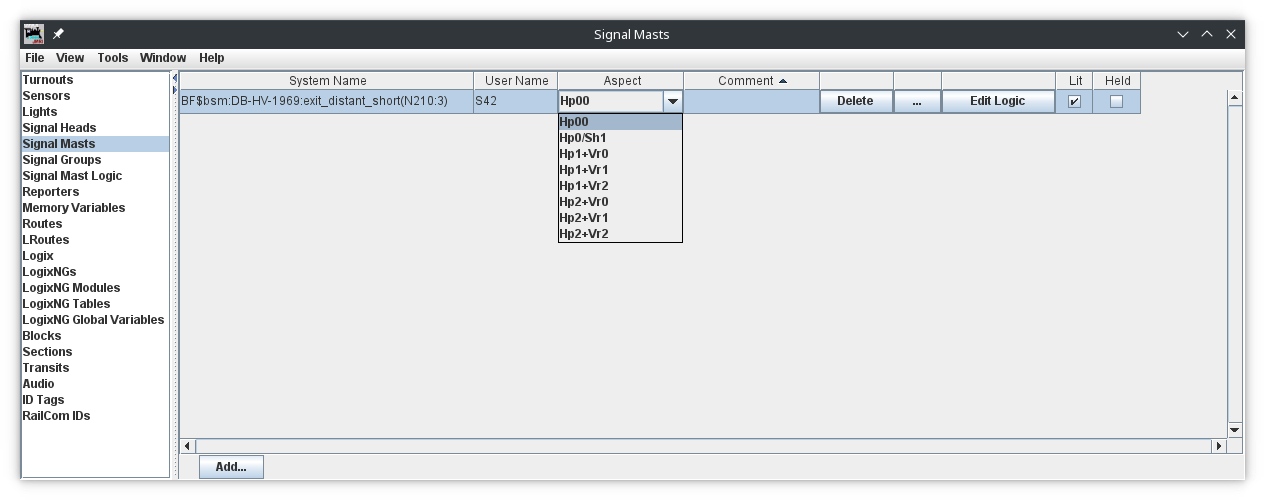
The following fields indicate the possible aspects of such a signal. The aspect number that has been defined in the hardware with the BiDiBWizard must be entered. In the example, the aspects were simply numbered from top to bottom, only the STOP aspect (Hp00 in this case) should always have aspect 0. The "Create" button creates the signal and the table contains a new entry:
The aspects can now be set manually from the list in column "Aspect". The signal mast can now be used in the panels.
BiDiB Signal Mast System Names
Valid BiDiB Signal Mast system names look like:- BF$bsm:DB-HV-1969:exit_distant_short(N210:3)
- B - The system connection letter
- F - Indicates signal mast
- $bsm - indicates an BiDiB mast
- DB-HV-1969 - signal system, german DB HV 1969 in this case
- exit_distant_short - mast type, combined exit and distance signal in this case
- N210:3 - BiDiB Accessory address, Accessory 3 at BiDiB node N210 in this case
JMRI Help
Back to the main BiDiB Help page

