JMRI: Running Nick Kulp's CornwallRR Program
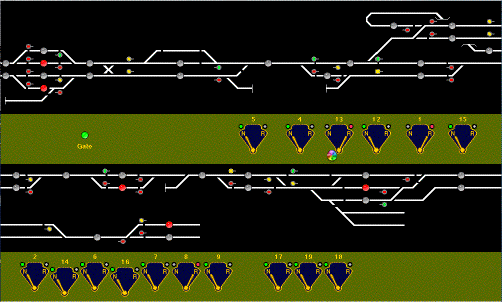
JMRI was used to create the dispatcher control panel for Nick Kulp's Cornwall RR. This page briefly describes how to run that so you can take a look at that. Links to other pages with more detail are included, but many of those pages do not exist yet or are still under construction.
The layout
Nick's layout uses a mixture of C/MRI and DCC. The block detectors, turnout position sensors, and signals are all attached to a C/MRI serial system. The locomotives are run using Digitrax DCC. Some turnouts are thrown manually, and some are operated by Tortoise motors connected to SwitchIt DCC decoders and thrown via the Digitrax system.The layout has 45 signal heads controlled by the C/MRI system. Most have red, yellow and green aspects; there are a couple that also indicate diverging routes with flashing yellow. The signals respond to occupancy to provide an automatic interlocking system.
Originally, the dispatcher worked via applications on two computers. One ran the C/MRI system that showed block occupancy and drove the signals, while another application on a different laptop was used to throw turnouts.
The new program
Nick wanted a computer-based panel for his dispatcher that would make it easier to run the railroad. It should clearly show which sections are occupied, how the turnouts will route the trains, and the appearance of the signals. It should also allow the dispatcher to change motorized turnouts with a click. And of course, it should look good.The most recent version of Nick's program is included as an example in each JMRI download. You can install and run it yourself if you'd like to see what it really looks like and play with the signals, etc.
Download and install
The CornwallRR sample program comes with all sufficiently-recent JMRI/DecoderPro free downloads. To find out how to download a version for your specific type of computer, please see the download pages.Starting the program
Starting the program varies with your computer system:- On a Macintosh, find the "CornwallRR" application icon and double click it.
- On Linux, run the CornwallRR.csh script.
- On Windows, go to the Start menu. Pull down the programs submenu, and look for the JMRI group. Select that group, and then select the CornwallRR icon.
- Upper "Layout connection": "CMRI serial"
- Upper "Serial port": (your com port)
- Lower "Layout connection": "LocoNet Simulator"
You can leave the rest of the settings at their default values. Click "Save", and when prompted if you want to quit the program say "yes". Restart the program. From now on, it should successfully run Nick's dispatcher panel in a layout-independent mode.
Working with the program
Unfortunately, the download doesn't include Nick's actual railroad, just the control panel. So you can't actually run his trains. But you can click on the screen to change the program's idea of block occupancy and turnout positions, and watch how the signals will respond on the actual layout.
The occupancy indicators look like
 if the section is occupied, and
 if it's not. If you click on one of these,
it will flip the state. If you "hover" the mouse pointer over it,
a tooltip will pop up that tells you it's exact name in Nick's
terms (a human-readable "user name"), and in the programs
naming convention (a
"System Name").
You can also click on many of the turnouts in the black and white schematic section to flip their state. (Some of them are not connected to the C/MRI system yet, and so are inert on the panel). In some cases, there are several turnouts connected together to form a crossing, so flipping one will cause the others to follow.
Note that the indicators by the levers in the green part of the panel follow the turnouts in the schematic; this is because they are both responding to C/MRI readback from the layout, and your clicks are fooling that into thinking the input has changed (in the absence of a C/MRI system responding on the serial port).
If you click on a lever, the lever will flip to the other position and a DCC command to change the turnout will be sent. If you're running this without Nick's layout, however, this command won't actually move a turnout and send feedback via C/MRI, so the turnout indicator in the schematic won't change.
Notice that the signals change in response to the position of turnouts and occupancy on the schematic. The program is doing this automatically by following logic that was copied from Nick's previous programs. This logic was translated by hand from QBASIC to Java, and embedded in the Cornwall program. We're working on more general approaches to this to make it easier for other people to create their own logic.
Summary
JMRI provides tools for creating custom control panels for a model railroad. It's flexible enough to do whatever you want, or at least whatever you're willing to spend the time to create. For more information on JMRI see the main web page. For links to download and install instructions for various computer types, see the download pages. Note that you have to have JMRI version 1.1.13 (or later) to run Nick's program; the most recent one (as long as it is compatible with your hardware) is preferred.
Back to CornwallRR home
