- Setup JMRI
- Getting Started
- Using DecoderPro
- DecoderPro® Programming Modes
- The Basic Programmer
- The Comprehensive Programmer
DecoderPro® Debug Menu
Virtual Sound Decoder
Manage VSD Locations
The Manage VSD Locations window provides a consolidated location to manage and set the apparent physical location of sounds for trains using Virtual Sound Decoder.
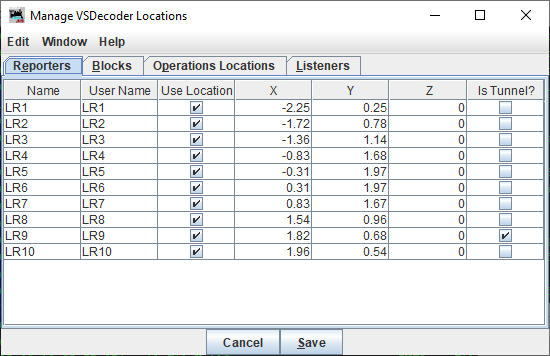
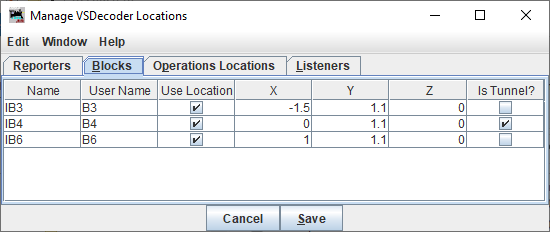
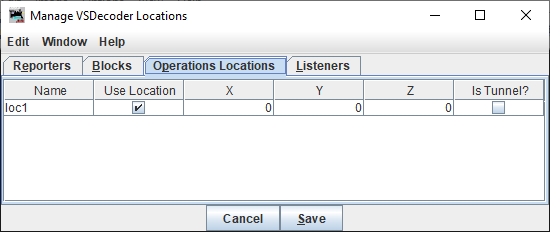
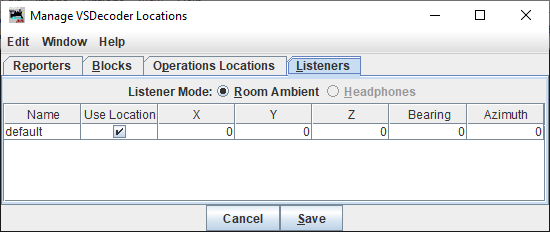
The Manage VSD Locations window has four tabs: Reporters, Blocks, Operations Locations, and Listeners. Each tab shows a list of objects, each with a check-box to enable/disable use (for VSD purposes, not for other JMRI purposes), and entry cells for X, Y, and Z location coordinates.Reporters

The Reporters tab shows a list of all currently defined Reporters. This is intended for use with Digitrax Transponding or other similar locomotive tracking hardware systems.
Blocks

The Blocks tab shows a list of all currently defined Blocks. This is intended for use with Digitrax Transponding or other similar locomotive tracking hardware systems. Using occupancy sensors it's possible to track exactly one loco.
Operations Locations

The Operations Locations tab shows a list of all Locations defined within the JMRI Operations system.
Listeners

The Listeners tab shows the location of the Listener in the VSD sound system. The Listener position has two additional measurements: the Bearing (angle clockwise from the Y axis) and Azimuth (angle up or down from the X/Y plane) which together describe which way the Listener is facing.
Location Following
With input from locomotive tracking hardware, Virtual Sound Decoder is able to move the apparent source of the locomotive sound to follow the locomotive's position on the layout.
Location Following Setup
To enable location following you will need a hardware method of tracking the locomotive's position on the layout. VSD currently supports the following tracking systems:- Digitrax Transponding (tested)
- Occupancy Sensors and JMRI Blocks (tested)
- ESU ECoS (not tested)
- RFID (not tested)
- RPS (not tested)
- RailCom / DCC4PC (not tested)
- Follow the directions appropriate to your hardware system for setting up Reporters or Sensors.
- Select Tools->Virtual Sound Decoder->Manage VSD Locations
- In the dialog, set X / Y / Z coordinates for each Reporter (or other Objects) you wish to use for VSD location following. Uncheck the "Use Location" box for Objects you do not wish to use for VSD tracking.
- Click "Save" to store the new values.
- Save your configuration either in a config file or as part of a Panel
Note: Reporters and Blocks are not added to the Manage VSD Locations "live". If you add new Reporters or Blocks, you must close and re-open the Manage VSD Locations window to make the new Reporters or Blocks appear.
Coordinate System
The VSD Locations system uses a standard "right handed" Cartesian coordinate system, where a location is defined by a combination of distances along an X, Y, and Z axis. The Origin, or center of the coordinates can be in any convenient location, such as the center of the room, a corner of the room, or a corner of the layout.
The X / Y / Z location values can be in any unit you choose, including an arbitrary relative scheme, as long as you are consistent. By default, positive X is to the space's right, positive Y is "forward", and positive Z is "up". Negative values are left, behind, and down, respectively. Alternately you may prefer to think of +X as "East", +Y as "North", and +Z as "up".
Note: The coordinate system can be rotated in any way that makes sense to the user. If it suits the railroad's arrangement better, +Y could be "East", +X "South", and +Z "Up". It is not recommended that the Z axis direction be changed however, unless your operators are accustomed to hanging from the ceiling.
A convenient system for a typical rectangular room-sized layout would be to place the origin at the near corner to the guest's left as the guest stands in the entry door, or the "bottom left" corner of the layout's track plan map, and with Z=0 at the layout's lowest nominal track elevation for the "live" part of the layout. This system ensures that all locations used will have positive X / Y / Z values.
Listener Location
If you do not specifically set the Listener location and orientation, the Listener by default will be at (0, 0, 0) and facing straight ahead along the +Y axis (bearing 0.0 degrees / azimuth 0.0 degrees). To set a different Listener location and/or orientation, go to the Listeners tab and set the X / Y / Z coordinates of the Listener's location. The coordinates and units must be the same as those used for the Reporters or other Objects.
The Bearing and Azimuth values set the orientation of the Listener, or the direction the Listener is facing. Bearing is measured clockwise from the +Y axis. Azimuth is measured up (or down if negative) from the X/Y plane. Both measurements are in units of degrees of angle. For example, a Listener standing at the Origin (0, 0, 0) and facing "West" and halfway "up" would have a Bearing of 270 and an Azimuth of +45.
Using Locations
When you have followed the above setup steps, launch the VSDecoder Manager window, create a VSDecoder and run the locomotive. As your locomotive moves around the layout, the sound will follow the locomotive's reported position.
Note: The sound will appear to "jump" from location to location as the locomotive's reported location changes. This effect will be smaller with additional and more closely spaced reporters or blocks.
Location Following using Occupancy Sensors and JMRI Blocks
If you have installed occupancy sensors, you can use JMRI Blocks to enable a location following.
A convenient way to do the setup is creating a Panel with the JMRI Layout Editor. A Layout Editor guidance can be found here.
Your Panel should have all the Blocks and attached Sensors you need. Test and store the
Panel.
Then launch the VSDecoder Manager window and create a VSDecoder.
To start the location following enter the number of the VSDecoder locomotive address into the
Value field of your starting block (Tools->Tables->Block). This sets the new sound
position. Now run your locomotive.
Location Following using JMRI Operations
If you do not have a hardware tracking system, you can use the JMRI Operations feature to enable a rudimentary form of location following.
To set the Operations locations:
- Select Tools->Operations->Locations
- Create Operations Locations within JMRI Operations
- Launch the Manage VSD Locations window
- Set the locations of the defined Operations Locations.
To use Operations for location following, assign the specific locomotive to the train, then select the train in the locomotive's VSDecoder Options pane. When you MOVE the train in Operations, the sound will move to the next location on the Route.
For more information on Operations, see the JMRI® Operations User's Guide
Advanced Location Following
With input from locomotive tracking hardware, Virtual Sound Decoder is able to move the apparent source of the locomotive sound to follow the locomotive's position on the layout.
The next section presents two setup possibilities - a newer and simple way based on a LayoutEditor panel and an earlier way by adding some geometric layout data into a file.
Advanced Location Following Setup
Since JMRI 4.99.5 there is an easy way to use Advanced Location Following. For the setup a LayoutEditor (LE) panel and a simple VSDGeoData.xm file is required.
The LE Panel must meet some minimum standards:
- at least one Track Segment with a Block
- no errors with Tools->Check (e.g. Un-Blocked Tracks)
- the LE panel should be close to the physical layout scale (if you want to use VSD on a real layout - this is not important for VSD in Simulator Mode)
Here is an example of a VSDGeoData.xml:
        <?xml version="1.0" encoding="UTF-8"?>
        <vsdecoder-geodata xmlns:xsi="http://www.w3.org/2001/XMLSchema-instance">
           <layout-scale>N</layout-scale>
           <check-time>2000</check-time>
           <models>Layout Editor Clinic - Full Signals</models>
           <models-origin>(346, 260, 0)</models-origin>
        </vsdecoder-geodata>
The attributes are:
- layout-scale: scale of the layout, default: N
- check-time: interval for calculating a new locomotive position; minimum: 500, maximum: 5000; default: 2000 milliseconds.
- models: the title of the LE panel
- models-origin: a location in the LE panel to mark the listener position; 3rd value is always zero; default: (346, 260, 0)
The file VSDGeoData.xml should be located in the same folder as your LayoutEditor panel.
To run a locomotive open PanelPro and load your LayoutEditor panel first. Then add a VSDecoder and start the engine. Now enter the DCC address in the Block Tables into a possible starting Block, then open the throttle.
The current sound position is printed in the System Console.
No further block setting is necessary if your are in Simulator Mode and the CheckBox "Use Blocks" in VSD Preferences is unchecked.
Watch the System Console for events that stop the sound positioning.
To use another panel do also change the panel title in the VSDGeoData.xml.
Turntables are not supported. The sound position remains unchanged, until you reverse the locomotive traveling direction.
Routes, Signals and Dispatcher are not tested.
Note: To hear the surround sound, at least two speakers are required.
And here is the old setup version of Advanced Location Following.
Note: JMRI Test Release 4.13.2 or newer required.
A file named VSDGeoData.xml is required, which provides two general attributes and some specific attributes for each location.
Here is an example of a VSDGeoData.xml with one location (geodataset):
        <?xml version="1.0" encoding="UTF-8"?>
        <vsdecoder-geodata xmlns:xsi="http://www.w3.org/2001/XMLSchema-instance">
           <layout-scale>N</layout-scale>
           <check-time>2000</check-time>
           <setup>
              <geodataset>
                 <reporter-systemname>LR1</reporter-systemname>
                 <position>(-1.5, 1.1, 0.0)</position>
                 <radius>0.0</radius>
                 <slope>0.0</slope>
                 <length>3.0</length>
                 <end-position>(1.5, 1.1, 0.0)</end-position>
              </geodataset>
           </setup>
        </vsdecoder-geodata>
The route in this example is defined as a straight line parallel to the X axis, with a length of three meters.
The general attributes are:
- layout scale (default: N)
- check time (interval for calculating a new locomotive position; minimum: 500, maximum: 5000, default: 2000 milliseconds).
The attributes for each location are:
- system name of the Reporter
- position (starting point) of the location
- length of the location in meters
- type of the location (only two types are supported: line or curve)
if the location is from type line, a slope value must be provided and the radius must be 0.0
if the location is from type curve, a radius value and the circle center point (rotate-xpos value, rotate-ypos value) must be provided - end-position (endpoint) of the location (last location only)
if the locomotive is running in a circle, the starting point of the first location and the endpoint must be identical
Example for curve attributes:
        ...
        <radius>1.18</radius>
        <rotate-xpos>0.0</rotate-xpos>
        <rotate-ypos>0.83</rotate-ypos>
        ...
The location (geodataset) sequence defined in VSDGeoData.xml describes a route on a layout. The described route should go away from the left to the right in forward direction, or in case of a circle, in clock-wise forward direction.
The Advanced Location Following allows up to four locomotives. Normally only one locomotive can be detected in a tracking section. If you want to run more than one locomotive, you may create a JMRI Route (again, up to four for VSD purposes) and add the Route to a Train. Please choose the predetermined Route names VSDRoute1 (default), VSDRoute2, VSDRoute3 or VSDRoute4. On the "Virtual Sound Decoder Manager" window you'll find an "Option" button on each VSDecoder. There you can select a JMRI Train and accordingly a Route. Please note that you need a setup section in your VSDGeoData.xml for each Route you want to use.
How to run a test with the JMRI LocoNet Simulator (without a connection to your layout):
- Make sure a Reporter named "LR1" is available after PanelPro has started (follow the directions appropriate to your hardware system for setting up Reporters)
- Create a XML file named VSDGeoData.xml (take the example mentioned above) and store the
file to the "Users Files Location" (JMRI\<Railroad Name>)
Note: Please make sure that there are no leading spaces in the first line of the file! - Download the VSD file Class64.vsd from the web
- Make sure your computer's audio system is working
- Launch PanelPro
- Open a JMRI throttle: Tools->Throttle->New Throttle->Address: 3->Set
- Add a VSDecoder: Tools->Virtual Sound Decoder->VSDecoder Manager->Add Decoder->Manual->Address: 3->Set->Load VSD File->File name: Class64.vsd->Select a Profile: Class64->OK->Start Engine
- Simulate an incoming Reporter: LocoNet->Send LocoNet Packet->Packet: d0 20 00 7d 03 00->Send->close the window
- Run the locomotive and hear the sound wandering from the left to the right
Note: If you choose a Diesel VSD file you might want to add a top-speed element in the config.xml. Please see the config.xml of a Steam VSD file for the syntax and the right place.
During the setting up and test process I recommend to open a JMRI system console, which might provide helpful information: Help > System Console.
You might also enrich the logging information, by adding the line
You might also enrich the logging information ( see Debugging and System Logging ), by adding the Logger Category Name
jmri.jmrit.vsdecoder.VSDGeoFile at DEBUG level.
Once you have a working setup, you can activate an option in your VSD configuration file to print the calculated position points describing the route of your locomotive. Please see the "Create XY coordinates output in console for a VSDecoder" option for details.
For questions, please contact me on the JMRI users Groups.io group.