- Development Tools
- Code Structure
- Techniques and Standards
- Help and Web Site
- How To
- Functional Info
- Background Info
JMRI Code: Git FAQ
This is a list of Frequently Asked Questions for Git, particularly regarding how we use it
with JMRI.
Click on a question to open the answer.
There's a separate JMRI Help page on how to get the code with Git.
See also the Technical index for more information on maintaining JMRI code.
See also the JMRI general FAQ.
Common User Topics
- How do I install Git?
-
Git is free software. Depending on your computer type and your preferences, there are
several ways to install it. There's more info in the Git community's Getting Started
guide.
- Get it from the Git download page.
- It comes with the GitHub Desktop application, available from the Git desktop download page (OS X and Windows only).See here for an intro.
- On the Mac, it's included when you install Xcode ( requires Apple Developer ID to Sign in ).
- On Linux you can use your package installer, e.g.
sudo yum install gitorsudo apt-get install git.
- Setting up a Git environment for JMRI Developers
-
You can set your local repository to pull automatically from the JMRI master on GitHub
and push to your fork (also on GitHub):
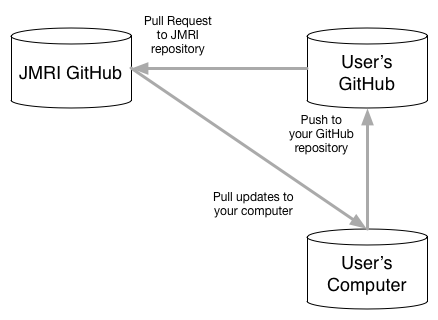
That horizontal arrow is the "Pull Request" (and subsequent pull) that records information about how things get into the repository.
The arrows are both operations (push, pull) and also definitions of where to look e.g. a URL. Git can store shorthand for a URL, called a "remote". The default remote is called "origin". You can have many remotes defined.
Via the git command line tool you do this with this command:
where$ git remote set-url --push origin https://github.com/username/JMRI.git
usernameis your github user name. You can check the current status with of the push and pull repositories with:$ git remote -v origin https://github.com/JMRI/JMRI.git (fetch) origin https://github.com/username/JMRI.git (push)
This says that, by default, fetches and pulls come from the main JMRI/JMRI repository. When you push, on the other hand, it goes to your own repository.
Once you have a copy of your changes on GitHub, it is easy to generate a Pull Request (link to GitHub)- In a browser, navigate to your repository on GitHub that has the changes you want someone else to pull and
- press the green compare icon
 , then click on Create Pull Request.
 - After your pull request has been reviewed, it can be merged back in to the main JMRI/JMRI repository. The JMRI developer who "pulls" your changes into the community source needs to have access to an online repository that has your changes, which is why you need to have a place on GitHub in the first place...
- Working with Git
-
With SVN and CVS, you check out a "working directory" to make your changes in, work in it for a while, and eventually commit all your changes back to the main repository.
Git works on a different idea. Instead of multiple working directories, you have a single repository that's been "cloned" from the main repository. If you're making individual little changes, you can work directly on the default "master" branch within it. If not, see Using Branches, below.
To understand Git, it is good to know about the various places in your local git repository:
- The content from the "remote" repo, which lives under the
.git/hidden directory, - The "staging" area (also called "index" or "cache"), and
- The named "branch" you are using, which lives in
- The working tree.
When you clone a git repo, you are creating a directory structure that holds all of these items. Unless you tell it otherwise, the working tree starts off filled with contents of the master branch of the repo you cloned - and the staging area is empty. As you make changes to the files in the working tree, you need to explicitly add them to the staging area. Git knows about these files, but they aren't yet officially part of your local repo.
Once you have populated the staging area with of all the things you have changed, a commit operation will, uhm, officially commit your changes to your repo's
.git/structure.When you pull or push, you are telling Git to synchronize your
.git/content with that of the remote repo you originally cloned things from.Getting Started
The first step is to log in to GitHub and clone your own copy of the main JMRI repo. This will give you a safe place to push and pull from without impacting others.
Using Git from the command line
- Clone the JMRI repo to your local system (or update it):
$ git clone https://github.com/JMRI/JMRI.git
or
$ git fetch
then
 $ git diff ...origin
 $ git merge origin/master
 Auto-merging ... files ...
 CONFLICT (content): Merge conflict in some_file
 Automatic merge failed; fix conflicts and then commit the result.
 $ vi some_file # the file has the conflicts marked, edit to fix...
 $ git add some_file
 $ git commit -m "Merged master fixed conflict"
 $ git merge origin/master
or
$ git pull https://github.com/JMRI/JMRI.git
- Make your changes locally, test them, etc.
 $ git add newfile
 $ git rm oldfile
 $ git add .

 $ git status

 $ git fetch
 $ git merge
- Make your changes available to the community
$ git commit -m "commit message" filename, filename
or
$ git commit -a -m "commit message"
Using GitHub Desktop application
GitHub Desktop is a free application that can do many of the same things that the git command-line tool does, but provides an interface that many people find easier and more friendly.
For more on GitHub Desktop, please see our page on using GitHub Desktop.
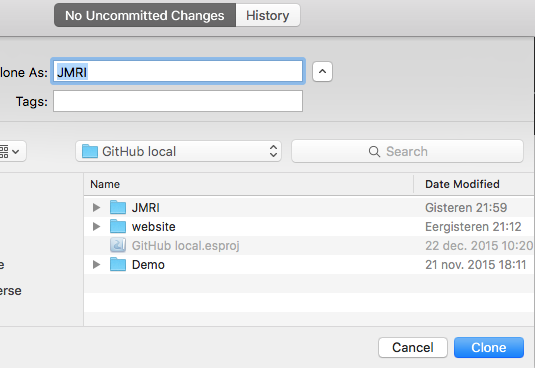
- Clone the JMRI repo to your local system by picking an item from the "Clone" tab in
the File -> Clone repository... menu and clicking "Clone":
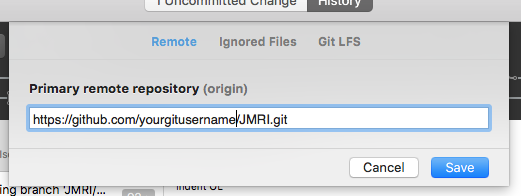
- Check your GitHub URL in the "Remote" tab from the Repository -> Repository
Settings menu as:
- Make your changes locally, test them, etc.
When it all works, commit your edit to your local JMRI repository by returning to the GitHub Desktop application, reviewing all changes noticed by the program, enter a Summary [1] and Description [2] and finally clicking the Commit to <branch> [3] button:
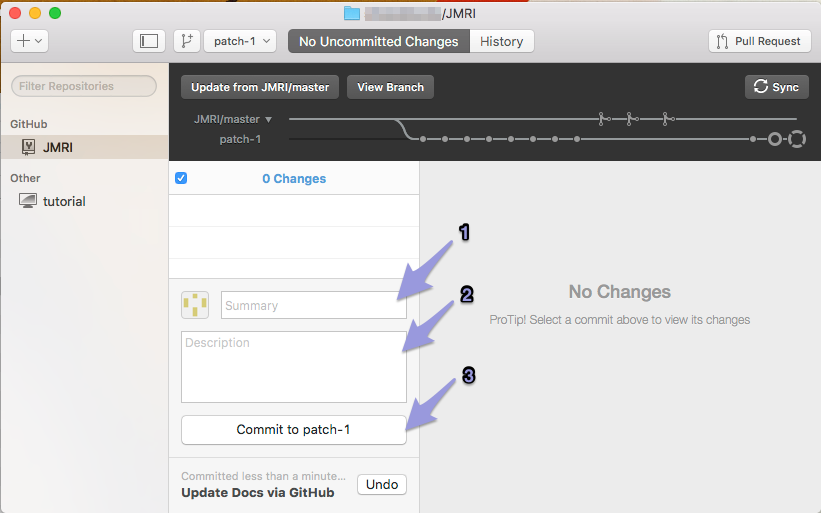
After your Commit, a white dot will appear near the end of the line that looks like a siding in a track plan. Click it to read the title. To see the files changed at another point in time, click an older commit dot:

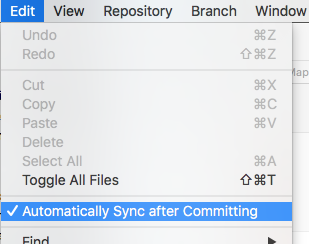
After a commit, your new edits are only added to your local copy of your branch. To have them show up in a place other people can see them, either click the Sync button at top right, choose Sync (Cmd-S) from the Repository menu or make Github Desktop automatically sync after every commit by checking the Automatically Sync after Committing menu item in the Edit menu:
- When you've worked on something in GhDt for a week or more, other people definitely
have worked on other parts of JMRI. To integrate these new data into your copy, click
the Update from JMRI/master button in the top left of the pane (or
choose "Pull" from the "Repository" menu).
You will see an animation of a small branch symbol in a circle, moving from the straight white line down to the line below it:

This tells you that new code has been copied to your repo, and in a few seconds this new code is also copied to your computer, so you can view it or use it, unless they've been working on the same lines of code (See Resolve a Merge Conflict, below)
- To make your changes available to the community click "Pull Request" (top right
button), enter a title and click "Create".

The name of the PR button will change into #123
signaling you can't make another PR in this branch
from here (but you can still commit extra edits to it):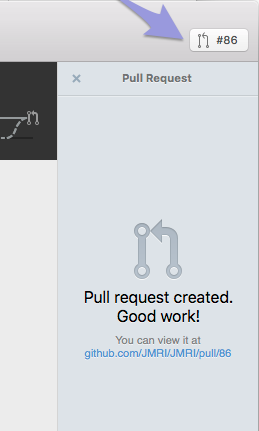
Normally, a PR is meant for the master branch of the _original_ repo, say JMRI:master. You may pull your PR in your own remote repo, but only a couple of people, the maintainers, can pull your edits into the "real" JMRI:master. Before they do that, they study what you've written, maybe even pull it into their own repo to test it before merging it for every other JMRI user to see.
When your PR is pulled & merged & closed, the PR #123 name will disappear and you may delete the branch safely.
- The content from the "remote" repo, which lives under the
- Branch Examples
-
 The
figure to the right shows a couple examples of how we use branches in Git. The black line
going from left to right is the "master" branch. Each dot on it is a change that somebody
made on the master branch.
At the left, the blue rectangle shows how a change can be made.
- Somebody created a new branch (the colored line)
- That person made a change on their new branch (colored dot)
- And then, through the PR process, that was merged back onto the master branch (rightmost black dot).
That basic process is used to make all the changes to the master branch, although for simplicity we haven't shown all the details for all of them.
Sometimes, your development work can take a while. Maybe you do it in several phases, making multiple commits. Before you're finally ready to merge it back into the common code with via a Pull Request (PR), somebody else can make a change on the master branch. The green path shows that case. The branch was created, development took some time, and then a change was made to master (black dot on black line) before the green change was merged back. The merge process in the green arrowhead took care of this. Generally, this is straightforward, because most of the code doesn't change very often: If just a couple changes have been made, they rarely overlap. This motivates our "merge often" philosophy.

Sometimes development goes on for such a long time that people made changes to master that matter to you. Perhaps they're new features or bug fixes that you'd like to have in your own development branch. Or perhaps they're changes that conflict, and you'd like to resolve those conflicts in your own work now, rather than waiting for later.
The 2nd diagram to the right has an example of this. After the programmer created the blue branch for his own work, changes were made on both his branch (first three dots on blue line) and on master (three dots on black line). Sometime after that 3rd change on master, the developer decided to "git merge master" onto his branch, bringing all those changes in via the black diagonal arrow. Both his changes and the changes to master are now present in the blue branch he's working on.
Later, he decides to merge his work back onto master via the blue arrow in the middle.
But at that point, he can still continue to work on his branch (next blue dot). Perhaps he's fixing a bug that was found by a user once the work was merged to master. Or perhaps he's just working more in the same direction. Either way, when he's ready, he can merge again (right-most blue diagonal), or keep working on his branch (blue line running off to right), or merge other people's work to his branch once it's merged (not shown).
By doing your work on your own branch:
- You get control over when you want to merge in other people work. You can hold off on that as long as you want, even distributing your own version if you want to.
- At the same time, you can merge your work into the master branch shared by others whenever it's ready, without disrupting your own work: Your branch is unchanged by merging it with master.
The basic idea is important: By working on a branch in your repository, your work can be kept a part of the overall JMRI effort instead of being isolated and unavailable.
- Using Branches
-
Always work on a named branch, never on the one named "master". Though you can
work directly on the default "master" branch, good "Git Hygiene" encourages you to create
a feature branch so you can work on it and never mess up your local copy of JMRI:master.
Branches in Git are easy and cheap to create and use; you can have multiple branches at
the same time, and switch between them as you work on different projects.
We recommend that you name branches starting with your GitHub account name or initials (for example, "abc") and something that suggests what you are working on:
"abc-decoder-xml-change","abc-2015-09-14","abc-next-cool-thing", and"abc-patch-NNNN"are all fine. That way, we know it's you, and you can sort out the rest. Keep the name short & simple enough to easily type (because people will sometimes have to), and limit it to letters, numbers and use the "-" instead of spaces; that'll make it easier to work with.- Using git:
- To create a branch called "branchname", you do
git checkout -b branchname
The "-b" says to create the branch. To switch to an existing branch, just leave out that option:
git checkout branchname
To see all the current branches, do
git branch
- If other people in the community make changes to the master branch, you can
keep your branch up to date by merging those changes in with your branch
 git checkout branchname
 git merge -m"merging in current contents of master" master
(If you leave off the message option, you may be prompted to add one in an editor) If any changes were picked up and merged in, you can then commit them to your branch:git commit -a
-
When you're done, merge your changes back into the common line of development with
 git checkout master
 git merge -m"merging to master" branchname
 git commit -a
- You can then delete your branch (if you're finally done with it) with
 git checkout master
 git branch -d branchname
- To create a branch called "branchname", you do
- Using GitHub Desktop:
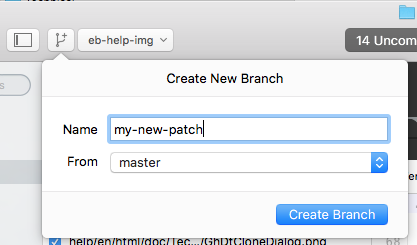
- Click the "Add a Branch (+)" button, provide a name for your new branch and
using the From: pop-up, select the branch from where you want to create the new
branch:
- To delete a branch, select it in the "Show Branches" pop-up menu, and then
select Delete "my-patch" from the Branch menu.
You can't do that with the master branch, so don't work in that, always work in a named branch.

- Click the "Add a Branch (+)" button, provide a name for your new branch and
using the From: pop-up, select the branch from where you want to create the new
branch:
- You can opt to create and delete branches in Github web just as easily. More help on Github Web Branching.
- Using git:
-
One of the advantages of Git branches is that it's easy for people to share them. This
lets one person work with something that another has done, including editing and
improving it, without it having to be released to everybody.
Say Arnie has developed something on the "arnie-great-tool" branch. Bill wants to try to use it on his layout. The steps are:
- Arnie commits it to local repository, and then pushes it to his GitHub repository.
 git checkout arnie-great-tool
 (work on changes)
 git commit -m"Added support for the Frobnab 2000"
 git push
- Bill can then get that by pulling it from Arnie's repository.
 git remote add arnie https://github.com/arnie/JMRI.git

 git fetch arnie arnie-great-tool
 git checkout arnie-great-tool
where the 2nd part of the "remote add" is the URL for Arnie's repository, and you just have to do that command once to define "arnie" as an alias you can use in "git fetch". - Now Bill can work with that code, and even change it as needed. If he makes changes
that he wants Arnie to have, he does the same process in reverse:
 git commit -m"Fixed a bug in sternerstat handling"
 git push
which commits the changes and pushes them up into Bill's repository on Github.Then Arnie can merge those changes into his own copy with:
 git checkout arnie-great-tool
 git pull https://github.com/bill/JMRI.git arnie-great-tool
- Arnie commits it to local repository, and then pushes it to his GitHub repository.
- Resolving a Merge Conflict
-
It's not uncommon for two or more people to have ideas about the same part of the program
or the JMRI website, each making commits and PR's for parts of the same files. If they
were working on different lines of text or code in one file, GitHub knows how to combine
those changes into one updated file. You may have to check your proposal still works, as
someone might have deleted the anchor you were referring to etc. If GHDt discovers that a
change from one person was inserted into master, and you have prepared changes to the
same line, GitHub Desktop asks you to help decide what to do by displaying the following
Conflict screen (Note the orange dots next to one of the file names):
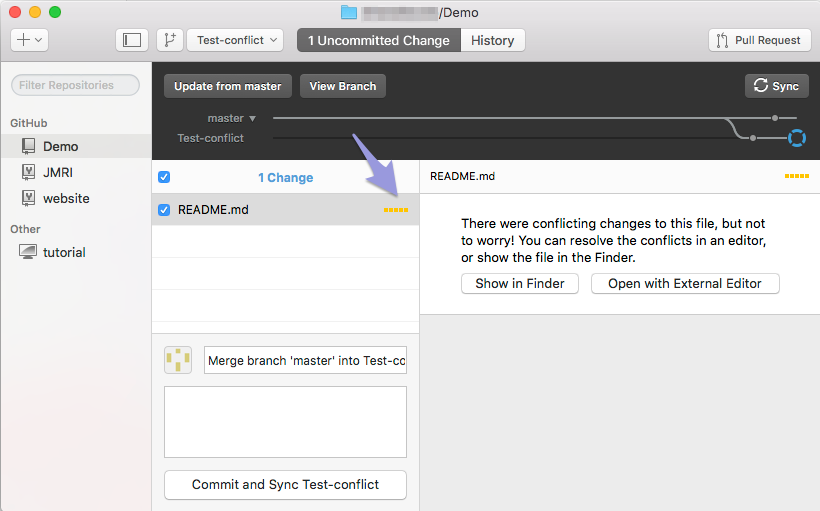
Click on that name and choose Show in Finder or Open with External Editor (GhDt itself has no edit tools).
To find the spot where the Conflict occurred, look for the<<< HEAD ==== >>> mastermarkers that were inserted by GitHub:

Choose which of both versions you wish to keep (or make some combination) and remove the< === >lines!

This new proposal should still be Committed to JMRI, so give it a fitting title i.e. "Solve conflict" and click Commit (and Sync). This extra commit will be added to your PR and be part of your proposal the maintainers will see. You shouldn't keep merge conflict lurking overnight, as the maintainers have no way to fix them for you and they will have to ignore it till you solved it.
- Continuous Integration Tests
-
The main JMRI repositories run a set of tests on every Pull Request (PR). This is called
Continuous Integration (CI), and is a time-proven method to keep code quality up.
You can add this to your repositor(ies) so that each push will get automatically tested.
The two CI test services are "Travis CI" and "GitHub":
- Travis CI runs on Linux. It first does a check for wrong line ends (see later section), then runs the complete set of JUnit tests, including testing screen operations.
- GitHub runs multiple operating systems.
- For Travis CI, go to the Travis CI web page and "Sign Up". Use your GitHub account and email. At the end of that process, it will ask you which of your GitHub repositories to monitor; you can select both the "JMRI" and "website" forks.
- GitHub is automatically available and working on personal forks.
- Handling Line Ends
-
Mac and Linux use a LF character at the end of each line; Windows uses the CRLF pair.
JMRI's text files are, by convention, stored in Git with LF line ends.
It's very important that Windows users not accidentally convert a file to CRLF line ends. When that happens, Git thinks that every line has been changed: Git can no longer provide useful, granular history information about earlier changes to the file.
There is a ".gitattributes" file that tells (most) command-line Git implementations how to handle this properly. Unfortunately, not all IDEs obey the directives in the file. For example, to get NetBeans on Windows to handle line-ends properly, a specific plugin must be installed. See the NetBeans JMRI help page for specifics.
If a file with changed line-ends is accidentally committed and forwarded in a pull-request (PR), the bad file in that PR will be detected during the Travis CI test and the PI will not be accepted and merged. Further, the PR will be marked with a "CRLF" label. Since the history has already been lost in this file, the CRLF label reminds the maintainers that it's not sufficient to just change the line-ends back to LF, commit and push: The history has been lost, and more complicated measures must be taken.
The two approaches are:- Abandon the PR and underlying edits, delete the branch, and redo it right. If you're working properly, with your changes in a separate branch, and committing small changes, this is the recommended course of action.
- Alternately, it's possible to use Git tools to remove the improper commit(s) from the branch. This is much more complicated. Get one of the developers with Git expertise to do it for you, and then send them cookies as a thank-you.
Maintainers who encounter an updated PR with the CRLF label should check to see that all the files in the PR do not show all lines changed. If they do, even if they have the correct LF line ends, the PR should not be merged.
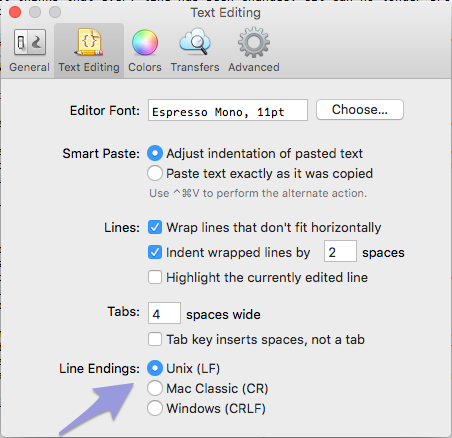
Many XML Editors have a Preference Setting for line ends.
For example, in Espresso check that Line Endings are set to Unix (LF) before starting to edit any JMRI file:
- Testing a Pull Request
-
Pull requests are just a special case of a branch. If you want to test them before merging them into master, you can bring them into your local repository and work with them.

In some cases, GitHub Web makes specific instructions available right on the pull-request itself. Look near the bottom of the discussion thread, in the last information block. The nice thing about those is that they automatically have the right branch names, etc, included.
Please note that, in some cases, these have a "Step 1" for looking at the pull request locally, and a "Step 2" for merging it back. Please do not do that Step 2 request from the command line, but instead use the web interface for doing the actual merge.
If no instructions are displayed, here's the sequence of things to do:
- Find the source repository and branch name. To do this, look at the top of the
branch request for a line that says:
user wants to merge 3 commits into JMRI:master from user:branch

- Next, pull that branch onto your own machine with the command:
where you have to replace each underlined value:
git fetch https://github.com/user/JMRI.git branch:local-branch
- Change "user" to the correct GitHub user name
- Change "branch" to the name of the branch in the pull request (it's OK if this is e.g. master)
- Change "local-branch" to what you want to call the branch on your own machine. This must not exist already. Something like "me-user-branch" will remind you of whose repository you pulled it from, while marking as subsequent changes as yours if you later share it with somebody else. (It's recommended that people start their branch names with their own name, which simplifies all sorts of operations)
- The branch now exists in your machine, and you can just move to it:
git checkout local-branch
then compile, test, etc. as you'd like. You can even commit and share changes if you'd like, because this is now your own development branch: It started at the other person's, but it's now your own.
- Find the source repository and branch name. To do this, look at the top of the
branch request for a line that says:
- Using "git bisect" to find the cause of a bug
-
If you have a reproducible problem that you think was introduced by a change to the code,
"git bisect" can help you track down the commit that caused it. It's very efficient at
tracking down repeating problems due to a single change.
Let's say that you know
v4.9.1does not have the problem, and commit23482341(made up number) does. A narrow range is good, but don't spend any time on it; git bisect does a binary search that's very efficient. Then you check out the bad version:git checkout 23482341
You start the bisect process:git bisect start git bisect bad git bisect good v4.9.1
I.e. set up your branch with the problem, start 'git bisect', tell it the problem is visible here and now, then tell it where there's a good version to search through. Git will sort out the possible revision path(s) where the problem can lie and devise an optimal search. Then it will checkout some place in the middle and tell you "Bisecting: 6 revisions left to test after this" or something like this.
Test that code:
ant clean tests
(and whatever you need to recreate). Once you know if it's good or bad, you saygit bisect good
or
git bisect bad
and repeat. Git will do a good job of giving you the minimal number of tests to do, and in the end will show you the commit that turned "good" into "bad" - not the PR, the single commit. You can then look at the exact changes in that commit to see what went wrong.After "git bisect" is finished, end the process with
git bisect reset
to get back to where you started. - Handling a GitHub contributed file or SF.net Patch
-
Sometimes people contribute files via the SF.net issue tracker or a GitHub Issue. This discussion talks about how to handle those.
- In your local repository, create a branch to hold the patch:
where NNNN is the patch number.git checkout -b patch-NNNN - Merge in the changed code as needed.
- Commit your changes:
git commit -m"Patch-NNNN plus the patch subject line (author name)" - It's now in your repository on a branch of its own, where you can sanity test things as usual.
- When you are happy, push your local repo's committed content to your GitHub
repository (assuming the default configuration, where "push" goes to your own
repository on GitHub) with
git push origin patch-NNNN - Go to your repository on GitHub and start the "pull request" process.
- On the second screen, switch the branch being compared in your repository from "master" to "patch-NNNN". Then the rest of the pull request goes as before.
- Eventually, a JMRI maintainer will handle the pull request and merge it, which will put the patch changes on the master branch in the repository.
- You can wait for the merge to the main repository, and then perform a
to update your local repository with this patch on the master branch. Or, if you need them sooner, you can immediately merge these changes onto your local master viagit pullgit checkout master
git merge patch-NNNN
- In your local repository, create a branch to hold the patch:
Less-Common Operations
- Migrating un-committed changes from a SVN checkout
-
As we migrated from SVN to Git in late 2015, you may still have edits based on old code. If you have changes to the JMRI code in an existing SVN checkout that you wish to commit to the current development version in Git, here's what we recommend:
- "Update" to the HEAD of SVN. You should be doing this routinely anyway, because
you'll need to do it before your changes can eventually be submitted. Do this now and
solve any problems.
$ svn update - Check the status and save the output. Double check that no conflicts are showing.
$ svn status
save a copy to reference later ...
$ svn status > saved-status.txt - Diff the sources and save the output.
$ svn diff > patch.txt - Clone a copy of the JMRI Git repository on your machine. (See the previous page for detailed instructions.)
$ git clone https://github.com/JMRI/JMRI.git - In your new Git repo clone, checkout the sources as they were when the code was
switched from SVN to Git:
This sets your working copy to be exactly the same as the last contents of SVN, the same as the base for the$ git checkout tags/svn-30001svn diffyou took earlier.
- Apply the changes you had made in SVN to the new Git tree
$ patch -p0 < patch.txt - If you had created any completely new files in the SVN working directory, i.e. ones
with "A" or "?" status:
- Copy those files into the corresponding place in your Git checkout.
-
Add them to the Git staging queue: To
git add (pathname)on each of them to tell Git about them$ git add pathname/to/new/file
- Check the status to get a list of changes.
You should see the same list of changed files as the "svn status" you ran earlier.$ git status
git stash savegit checkout mastergit stash pop
Depending on how much progress has taken place in Git, this might show some conflicts. If so, you have to resolve them here.
Now you can start developing, without having lost anything.
- "Update" to the HEAD of SVN. You should be doing this routinely anyway, because
you'll need to do it before your changes can eventually be submitted. Do this now and
solve any problems.
- Embedded CVS, RCS and SVN cookies
-
When JMRI was originally using CVS, we used lines like:
# The next line is maintained by CVS, please don't change it

          # $Revision$
as an additional way of tracking file versions. When we migrated to SVN, we kept those lines in certain files, like decoder XML, properties files, etc, that users are likely to edit and submit back for inclusion.But with Git, there's less need for these. So we'll be removing these lines as time allows. If you're working on a file and happen to see one, usually in the header, you can just delete it (if it has somebody's name, you might want to add that to the copyright notice if there is one.)