JMRI: CBUS Node Manager
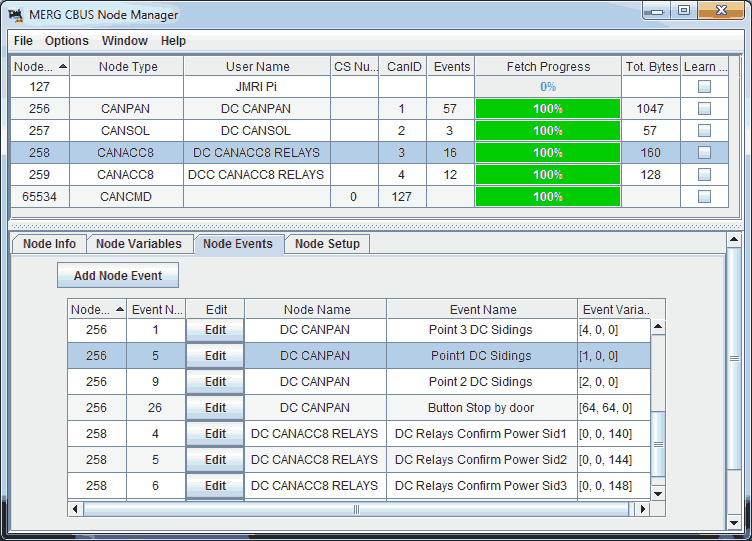
The node manager comprises a Node Table, along with node configuration abilities.
Apart from being a setup tool, this table is used by JMRI to locate DC / DCC Command stations, enabling features for the command stations which support them.
You can open multiple manager windows, these will all use the same node database.
Node Table
The top half of the screen displays a Node table, while the bottom half displays details about the selected node.
Nodes will be added to the table when a node admin operation OPC is heard for the node number.
Nodes ( and command stations ) will also be added following a node or command station search.
There is one row in the table for each node number.
The manager will query any node added to the table for its properties.
If enabled, this will trigger the background fetch of the full node configuration.
When a node is selected in the table, any background fetching will be prioritised to that node.
Columns :
- Node Number
- Node Type eg. CANPAN, as reported by node
- User Name - Editable
- Command Station Number - Only available if the node is a command station
- CAN ID - See node setup tab to edit
- Events - Number of events currently stored on the node
- Fetch Progress - Percentage of total node config downloaded to JMRI
- Total Bytes - Total node data bytes
- Learn Mode - Checked if the node is currently in learn mode
Pre-fetching enables quick node editing, and may be the basis for any future node backup integration.
Node data bytes are calculated as the sum of :
- Number of Node Parameters
- Number of Node Variables ( NVs )
- Number of events x 5 ( initial event index fetch )
- Number of events x Number of event variables per event
You can click into the Node Name cell to edit the node name.
You can remove a node from the table via the Node Setup tab.
File Menu
Import Node Names from FCU File ( node names not currently maintained between sessions )
Restore Node From FCU File - see Restore from FCU
Options Menu
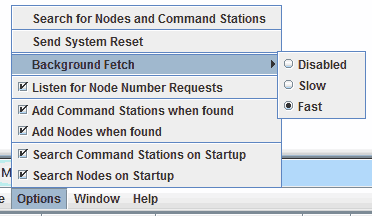
- Search for Nodes and Command Stations
You can select Options > Search for Nodes and Command Stations whereby the manager will request each node on the CBUS network to report back.
Each node which reports itself is sent a message to take it out of any existing learn event mode.
A message identifying nodes in setup mode, ie requesting a node number will also be sent to the network. - Send System Reset OPC
- Background Fetch
The background fetch attempts to use low traffic periods on the CBUS network to refresh Node details.
If Fast is selected, the system will check every 20ms for any traffic on the CBUS network.
If no traffic is observed, and there is no current data fetch, a data request to the node will be made.
If slow is selected, this is reduced to every 50ms. - Listen for Node Number Requests
- Add Command Stations to table when found
- Add nodes to table when found
- Search for Command Stations on JMRI startup
- Search for nodes on JMRI startup
Options are saved between sessions on a per-profile basis.
Node Info
Additional node information including, if available
- Manufacturer
- Node type text
- Firmware Version
- Total Node Variables
- Total Parameters
- Event Variables per event
- Maximum node events
- Bus type
- Node Support Link
Node Variables
This is a tool for Node Variable and Node Event editing.
Other tools may be more appropriate for full node configuration.
JMRI does not save node configuration changes, this is all saved on the node.
It is sensible to make regular backups of your node configurations using appropriate software.
Do not blindly change NVs to see what happens! Use in conjunction with the individual module documentation.
These are displayed in a table form.
Table columns include the NV number, along with the NV value in decimal, hex and binary forms.
Click edit to edit the NVs, the edit screen will open in a new window.
Editing Generic Node Variables
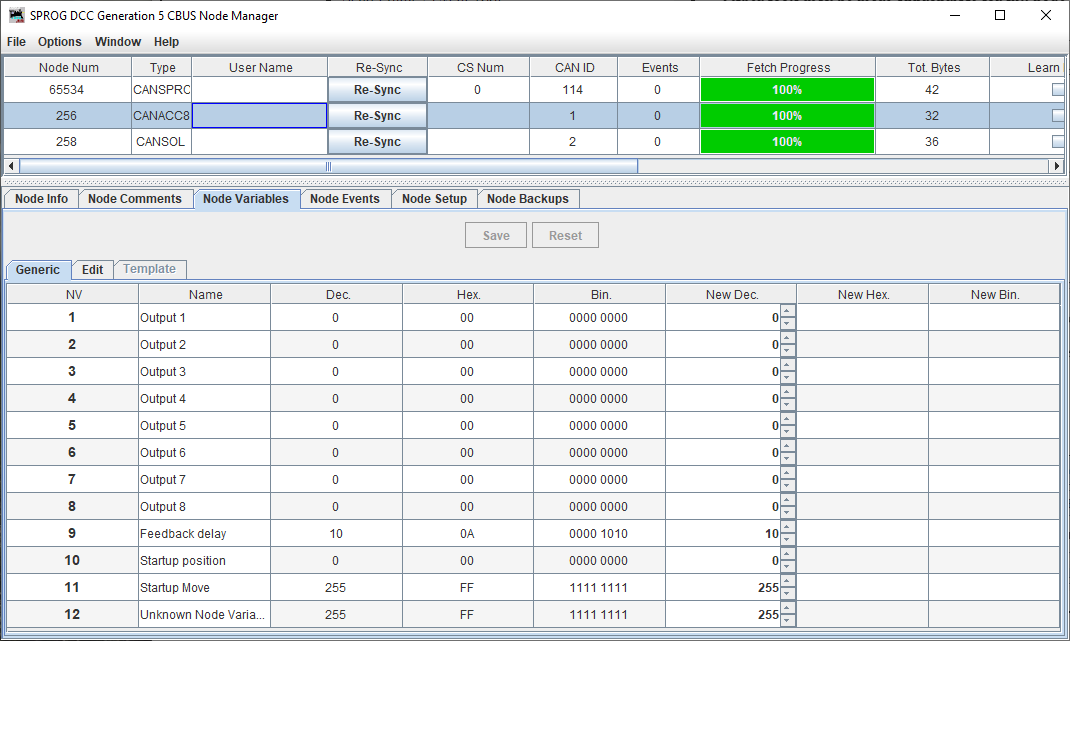
The generic node variable tab displays the raw node variable values for any CBUS node.
Columns on the left are the current values, columns on the right show proposed.
If the values have been changed, the row is highlighted yellow.
To write the new NV's, the save button is enabled when a variable has been changed.
Click on this button for a confirmation before writing, after which the window will close.
Using the Node Variable Edit GUI
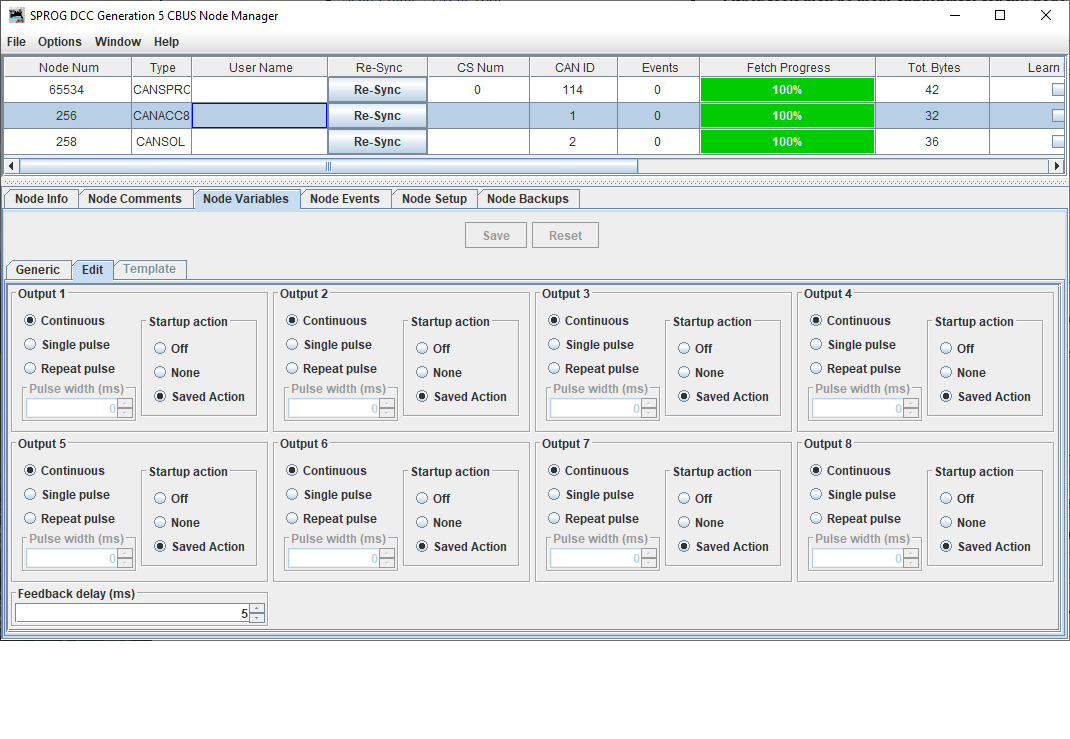
The Edit tab presents a more user friendly view of Node Variables for those nodes that are supported. Physical quantities such as delays and currents will be scaled to display the physical value, rather that the raw node variable value shown in the generic tab. Hover over individual objects for tool tips or refer to the node documentation for full details.
Changes in the edit tab will be reflected in the generic tab, and vice-versa.
Node Events
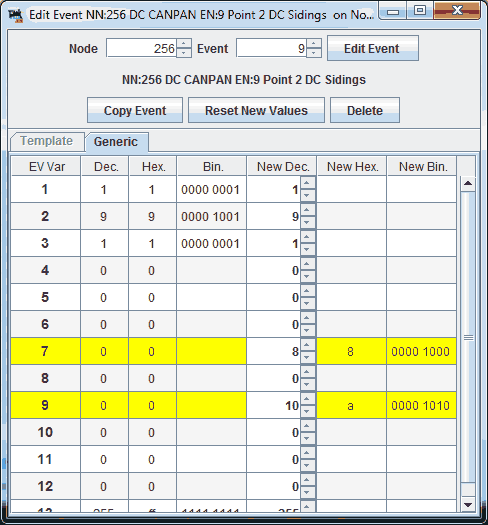
You can create new node events by dragging an event from the CBUS event table to the Node Manager window.
If the event is new to the node it will open in a new event window.
If the event is already on the node, it will open in an edit event window.
Click on the Edit button in the event list, or the new event button to bring up the edit event window.
The event and node combination are set at the top of the list
The node and event names are looked up from the CBUS Event Table when the spinners are changed.
The action buttons will be enabled or disabled depending on how the event number has changed.
Do not blindly change Event Variables to see what happens! Use in conjunction with the individual node documentation.
Any existing values are shown on the left of the table, proposed values on the right.
Zero values are not displayed for binary columns to help identify populated values.
Use the spinners or enter a value in the cell to edit the value.
Any changed variables will have their rows highlighted yellow.
The number of variables per event will depend on the node specific event settings and firmware.
Click on edit or new event to save this to the node.
When teaching,
Copying an event will also copy the event variables into a new event ready for editing.
If deleting an event from the node you will be asked to confirm this.
The edit event window will remain open after teach or edit event operations.
At present, only the generic tab is available. Templates may be available in due course.
Node Setup
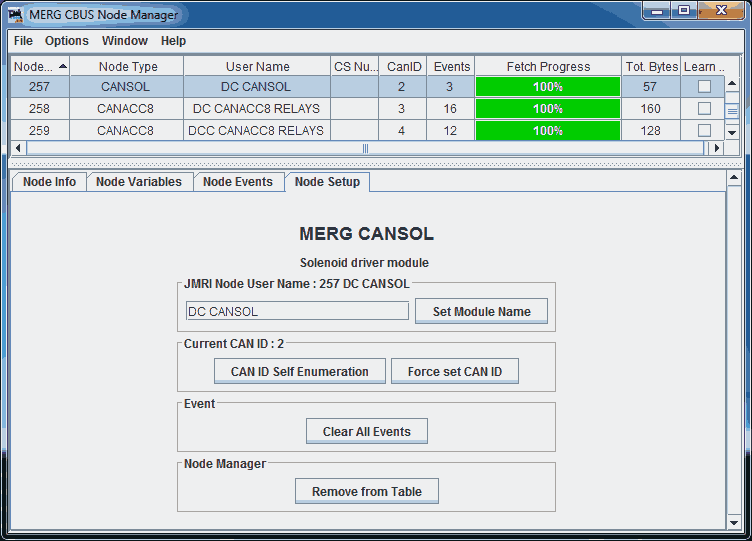
The node setup tab contains some lesser used node setup functionality.
The node JMRI user name is used to refer to the node in the CBUS Console and other CBUS applications.
CAN Self-enumeration sends an enumeration request to the node, which should then sort itself out with a good CAN ID.
The CAN can also be set manually by clicking on the force set button.
A popup dialogue will ask for the new CAN ID, min 1, max 99.
Clear All Events from Node button
Remove from table button
Node Numbers
Node Number : Each individual module in FLIM operation has a node number.
A node number is requested by the holding down the FLiM button on a node.
JMRI can listen for modules requesting a node number.
This is enabled by default, though can be disabled in the Node Manager options menu.
On hearing a node number request, an allocation popup window will be displayed.
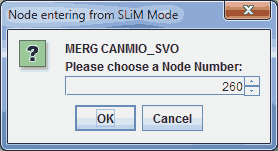
Using the number spinner or keyboard, enter the numerical Node number you would like for the node.
It is suggested that you allocate node numbers above 256, the maximum non-reserved number is 65,533
If a reserved OpCode is used, the background will turn yellow with explanation.
If an existing node number being used is selected, the background will turn red.
MERG FCU xml file - Restore Node / Import CBUS Event and Node Names
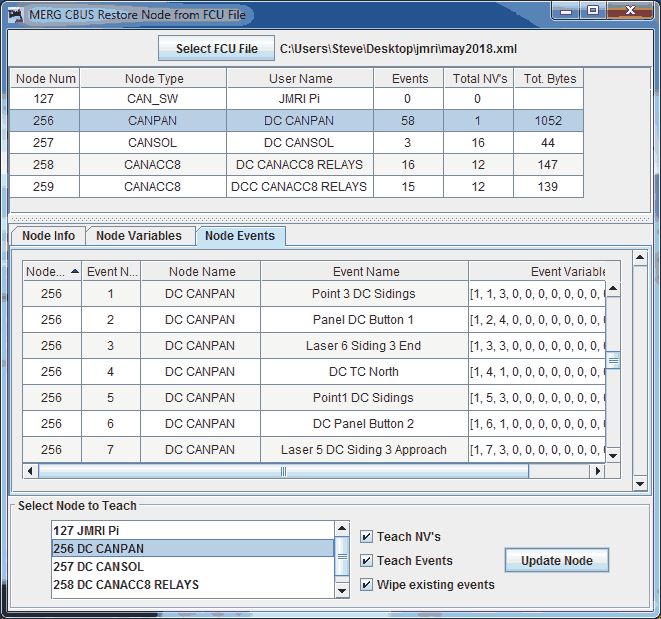
- Restore Node NV's and Events
- Import Node Names to the main Node Manager
- Import Event Names to the JMRI CBUS Event Table
Open the restore window via the Node Manager File Menu > Restore Node from FCU xml
Select an FCU xml file from the button at top of the screen.
Nodes within the file will appear in the top table.
There are tabs for viewing the information on the selected node, node variables and node events in the centre of the window.
If the JMRI CBUS Event Table is running, Events encountered will be added if not already present. An event name will be added to an existing event table entry if it has no event name.
Node names are imported to the main node table, updating the node name if unset.
If a node number is not present in the table, a new row will be created enabling the node
name to be used within other JMRI CBUS applications.
Restore options are towards the bottom of the screen.
Nodes from the main Node Table are listed toward the bottom left of the restore screen.
Both NV and event transfer can be independently selected.
There is also an option to clear any existing events on the node.
When a matching FCU node and a node table node have both been selected, the Update Node button will become active.
The donor node and the target node require the same amount of NVs or Event Variables.
Once clicked, there's a confirmation popup confirming the options which are set.
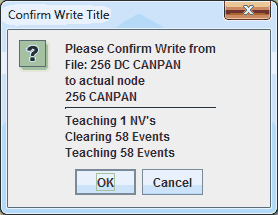
Click OK, the busy icon will appear and the write process will commence.
Any unchanged values will NOT be written to the node.
As with other operations, the node being taught will update in real time via the main node table.
On teach completion, the busy icon will dissapear and a teach failure popup will display should any issues be detected.
Further information on the teach process may also be available in the JMRI Console Log.
Sent Operation Codes
- EVULN - Sent when deleting an event, also sent when editing an event.
- EVLRN - Sent to teach an event variable.
- NERD - Sent when requesting node events.
- NNLRN - Sent to request node enter learn mode, prior to deleting an event or teaching an event.
- NVSET - Sent when editing NV's.
- NVRD - Sent when NV window selected in get node variable loop.
- QNN - Sent when refreshing node list.
- REVAL - Sent when node event window selected, to request each event value.
- RQEVN - Sent when node selected prior to building event list.
- RQMN - Request Module Name - Sent to request module name when in setup mode.
- RQNP - Sent on refresh node list to identify any nodes already in setup mode. Also sent in response to a node requesting a node number.
- RQNPN - Sent when node selected to receive node parameter total, also sent to get each node parameter.
- SNN - Sent to allocate a node number following user choosing number.
Received Operation Codes
- CANID - Listener to set node to a specific CAN ID.
- CMDERR - Constant listener with extra functionality
- When waiting for unlearn event response
- When waiting for a response to setting event
- When waiting for a response to setting NV
- ENRSP - Listener when waiting for node event list.
- ENUM - Listener to auto reset CAN ID.
- EVLRN - Listener to teach event in learn mode.
- EVLRNI - Listener to modify event in learn mode by index ( Node must have a valid index ).
- EVULN - Listener to remove event in learn mode.
- NEVAL - Listen when waiting for an event variable.
- NNACK - Listener when waiting for a SNN response.
- NNCLR - Listener to clear all Node events
- NNLRN - Listener for when node enters Learn Mode
- NNREL - Constant listener for node number release
Node will be removed from Node manager table as any previous data cannot be relied on. - NNULN - Listener for when node exits Learn Mode
- NVANS - Listener when waiting for node NV's.
- NVSET - Listener for node set single NV.
- NUMEV - Listener when waiting for number of node events.
- PARAMS - Listener for setup mode on node list refresh, listener when an RQNP has been sent.
- PARAN - Listener when waiting for node ( which is not in setup ) parameters.
- PNN - Update from Node - Can create a new Node Manager table row.
- RQNN - Constant listener for node number requests.
- STAT - Update from Command Station - Can create a new Node Manager table row.
- WRACK -
- Listener when waiting for unlearn event response
- Listener when waiting for a response to setting event
- Listener when waiting for a response to setting NV
All nodes are referred to by both Manufacturer and Node Type.
Variance to CBUS Developers Guide 6b
It cannot be guaranteed that another program within the JMRI suite will not send any normal operational OPC to a module which is in learn mode.
JMRI Help
You can view this help page within JMRI by selecting Help > Window Help in the top bar of the CBUS Node Manager window.
The methods to teach nodes are accessible via Jython script, and include single commands which take care of all of the loops.
CBUS® is a registered trade mark of Dr Michael Bolton
Thanks and congratulations to all who contributed! Contact us via the JMRI users Groups.io group.
Copyright © 1997 - 2024 JMRI Community. JMRI®, DecoderPro®, PanelPro™, DispatcherPro™, OperationsPro™, SignalPro™, SoundPro™, LccPro™, TrainPro™, Logix™, LogixNG™ and associated logos are our trademarks. Additional information on copyright, trademarks and licenses is linked here.
View the