LogixNG Reference - Chapter 11
LogixNG Tables
LogixNG Tables are two dimensional data structures, like a spreadsheet.
Example:
| A | B | C | D | |
|---|---|---|---|---|
| 1 | West yard | East yard | North yard | |
| 2 | Left entrance of the yard | |||
| 3 | Leftmost turnout | IT101 | IT201 | IT301 |
| 4 | Left turnout | IT103 | IT203 | IT303 |
| 5 | Right entrance of the yard | |||
| 6 | Rightmost turnout | IT112 | IT212 | IT312 |
| 7 | Right turnout | IT114 | IT214 | IT314 |
A table can be used to create a lookup table. It's accessed by either its system name or its user name, followed by a left square bracket, the name of the row, a comma, the name of the column, and a right square bracket.
Instead of the names of the row and column, it's also possible to use the row number or the column number. The row and column numbers start at 0 with the row names in column 0 and the column names in row 0. The first data cell is 1,1. In spreadsheet terms, this is B2.
Note that spreadsheet software, like Excel and LibreOffice Calc, has cell <column letter><row number> while references in JMRI has table[row,column]. Example: Cell B3 is table[2,1], since B3 is row 2 and column 1.
To avoid confusion, use the row and column names.
Example from the table above. These examples assume that IM3 has the value 'West yard', IM4 has the value 'Rightmost turnout' and IM5 has the value 'IQT22'.
| Cell | Value | Note |
| IQT22[0,1] | West yard | Cell B1 has the name of column B |
| IQT22[2,0] | Leftmost turnout | Cell A3 has the name of row 2 |
| Yard table[2,0] | Leftmost turnout | The user name of the table can be used to access the table |
| IQT22[3,2] | IT203 | Cell C4 has the value 'IT203' |
| IQT22[Left turnout,North yard] | IT303 | Column 'North yard' and row 'Left turnout' has the cell D4 with the value 'IT303' |
| Yard table[Left turnout,North yard] | IT303 | Column 'North yard' and row 'Left turnout' has the cell D4 with the value 'IT303' |
| IQT22[Leftmost turnout,{IM3}] | IT101 | IM3 is in curly brackets and have the value 'West yard' so this points to cell B3 |
| IQT22[{IM4},East yard] | IT212 | IM4 is in curly brackets and have the value 'Rightmost turnout' so this points to cell C6 |
| IQT22[{IM4},{IM3}] | IT112 | Column {IM3} and row {IM4} points to cell B6 |
| {IM5}[{IM4},{IM3}] | IT112 | Even the table name can be accessed indirectly |
Note that a Memory can point to a table. For example, if the memory IM7 has the value '{Yard table[{IM3},Leftmost turnout]}', LogixNG will look at IM7, and find that it's value is in curly brackets. It will then resolve the value inside these curly brackets, which is 'Yard table[{IM3},Leftmost turnout]'. It will then resolve the value of IM3 which has the value 'West yard'. It will then get the table cell 'Yard table[West yard,Leftmost turnout]' which is cell B3 with the value 'IT101'.
The tables are created using a spreadsheet program and then exported as a CSV file. PanelPro Tools ⇒ Tables ⇒ LogixNG ⇒ LogixNG Tables is used to load the table into JMRI memory. See LogixNG Tables Table for details. The table is not stored in the PanelPro data file. When the data file is loaded, a reference to the table will be used to load the CSV file into memory. The CSV file should be located in the user files location along with the PanelPro data file.
Simplified Table Cell Referencesince 4.99.3
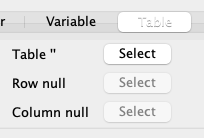
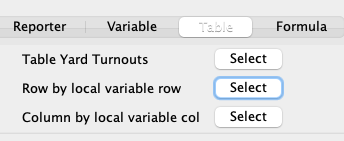
Instead of the complex table/row/column text reference, the actions and expressions for Memory and Local Variable table addressing use a three field reference.
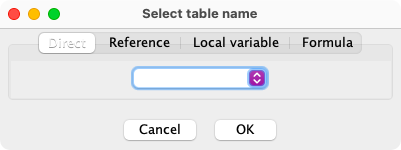
The first step is to select the table which has been loaded using LogixNG Tables.
In addition to selecting from a drop down list, indirect references, local variables and formulas can be used to determine the table name.
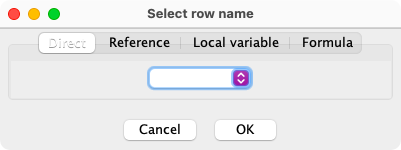
The second step is to select the row.
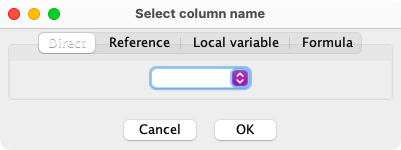
And select the column.
This is the result. This example is using local variables for the row and column.
Here is the row in the tree editor along with a second row that uses a formula.
Using comments in the table
It's useful to be able to add comments in the table, especially for large tables. Therefore LogixNG has a simple way to add comments to tables. If the header of a row or column is empty, LogixNG treats that row or column as a comment. So if you want to add a comment on a row, leave the first column on that row empty. And if you want to add a comment on a column, leave the first row on that column empty. If the first cell on a row or column is empty, the action "Table: For each" will skip that row or column entirely.
The CSV File
You must not use single or double quotes in the CSV table. OpenOffice Calc uses different single quote characters at the beginning of a word and at the end of a word, and if you store a CSV file with these, you might end up with non readable characters in the CSV file. OpenOffice Calc also writes non readable characters for double quote characters to the CSV file.
Also, don't use backspace in the CSV file. It might later be supported to quote other characters so it's reserved for now.
If a name has the characters comma, left or right square bracket or left or right curly brackets, these characters must be escaped by preceding them with a backslash. Examples: \, \[ \] \{ \} \\
If a reference contains a backslash, it will take some more time to evaluate it than if it doesn't contain any backslash. So if it's possible to not use these special characters in references or names of beans, it's recommended.
Table Actions
There are four LogixNG actions for working with tables
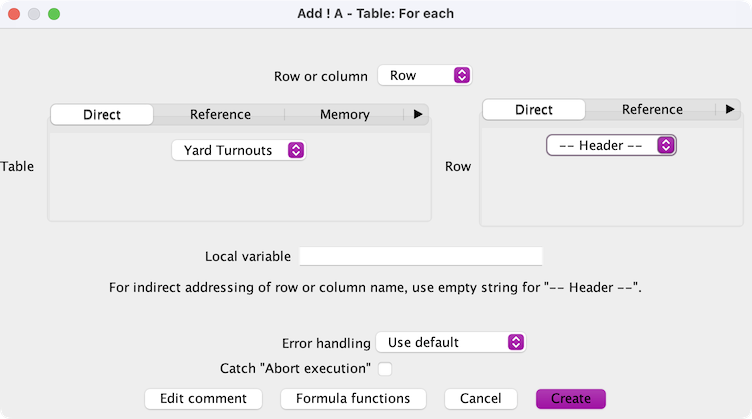
Table: For each
This is used to look at the rows for a column or the columns for a row.
The contents of a series of cells will be placed in a local variable. As each cell is processed, the action will be performed.
To create the action, select the Table: For each type from the Common category.
Select the table, row or column, and then the row name or column name. The name selection will change based on the table and row/column selections. Enter the name of a local variable. The table, row and column names can also refer to local variables or references.
After the action has been created, add another action to the new A1 to handle the current cell item.
If the -- Header -- item is selected, the column names will be returned if Row is selected and the row names if Column is selected. since 5.7.4
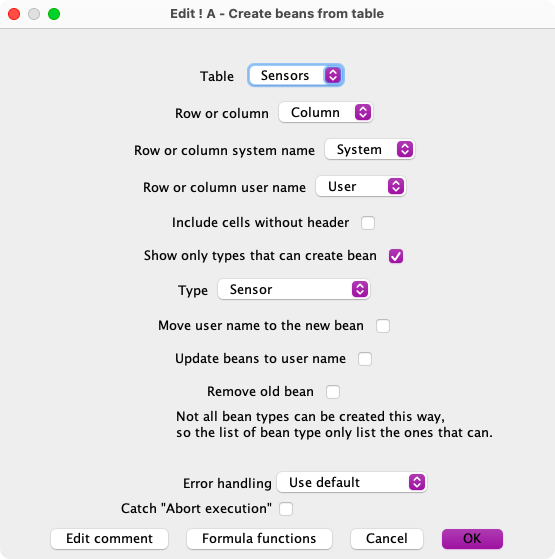
Create beans from tablesince 5.1.6
A spreadsheet can be used to create some of the standard table entries in PanelPro, such as sensors and turnouts. The spreadsheet is exported as a CSV file and loaded as a LogixNG Table.
The system names have to be valid based on the connection and the bean type. For example,
a LocoNet sensor would be LS101. The user names are free format but must be
unique. If the user names match existing user names, the move user name option needs to be
enabled.
Options:
- Move the user name to the new bean
If the user name matches an existing user name, the new item is created with its system name and then the user name is Moved from the original item. For example, turnouts were defined using internal system names and user names. When the real turnout names have been identified, this option can be used to create the real turnouts and move the names from the internal turnouts.
After the user names have been moved, it is necessary to store the current PanelPro state, quit and restart PanelPro, and load the xml data file.
- Update beans to user name
- When the move user name option is enabled, the references will be changed from the system name to the user name.
- Remove old bean
- When the move user name option is enabled, the orignal item will be removed if possible.
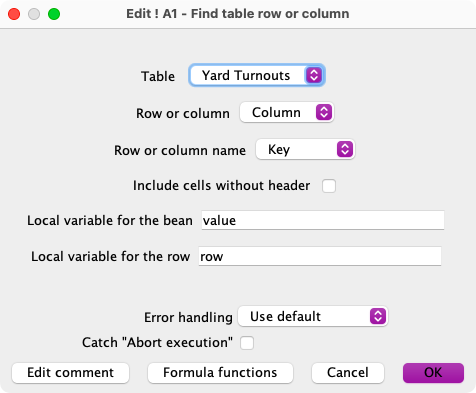
Find table row or columnsince 5.1.6
Search table cells for a cell that contains the string value in the bean local variable. When a match is found, a map of the cells for the row or column is in the row local variable. See Local Variable Types.
A LogixNG table is selected from the Table list.
If Row or column is set to Row, a row is selected from the Row or column name list. If a match is found, the row local variable will contain a map of the cells in the column.
If Row or column is set to Column, a column is selected from the Row or column name list. If a match is found, the row local variable will contain a map of the cells in the row.
The Local variable for the bean is the name of a local variable that contains the string value for the search. In spite of the name, the value can be any text that occurs in the table.
The Local variable for the row is the name of a local variable that will contain the map of the row or column if match is found. If a match is not found, the row local variable will have a null value.
The match process stops when the first cell match occurs.
Listen on beans - Table
Since the items in the table, such as turnouts and sensors, are accessed using references, when their state changes, there is no notification of the event. See Chapter 7 for details about the issue.
Rather than creating a Listen on beans list entry for each item, the Listen on beans - table action can simplify creating the listeners.
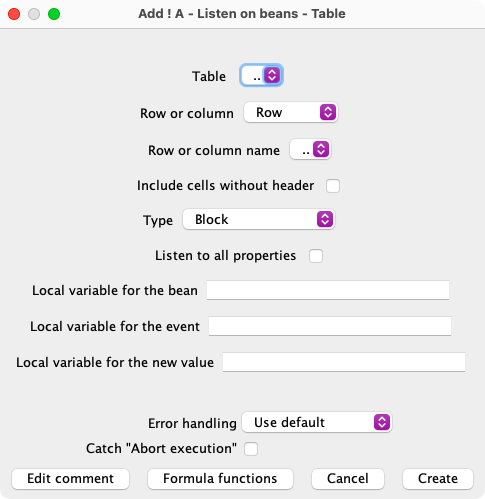
To create the action, select the Listen on beans - Table type from the Other category.
Select the table, row or column, and then the row name or column name. The name selection will change based on the table and row/column selections. Select the type of item.
The various bean types have standard properties that are monitored such as Closed and Thrown for turnouts. If the Listen to all properties option is checked, all of the properties will be monitored.
Optional local variables can be assigned to contain information from the listener event.
- Bean — The affected object.
- Event — The property name.
- Value — The new value.
Tables - working with templates
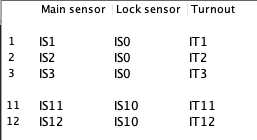
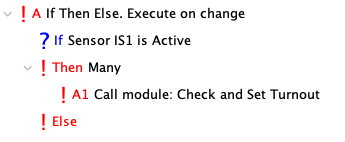
The sample shown on the home page is an example of a template. A module is created that implements the locking logic. It can be used for any turnout that can be locked by a sensor.
The data for the template comes from a table. The table identifies the sensor that is used to request that a turnout be toggled, the sensor that can used to lock the turnout and the name of the turnout.
See Chapter 10 - Modules for details about modules.
The module is supplied the row name for the turnout. The row name is used to find the lock sensor. If the sensor is not active, the row name is used to find the turnout and set its state to toggle.
To invoke the module, a ConditionalNG sets the module's variable with a row name and calls the module.
Thanks and congratulations to all who contributed! Contact us via the JMRI users Groups.io group.
Copyright © 1997 - 2024 JMRI Community. JMRI®, DecoderPro®, PanelPro™, DispatcherPro™, OperationsPro™, SignalPro™, SoundPro™, LccPro™, TrainPro™, Logix™, LogixNG™ and associated logos are our trademarks. Additional information on copyright, trademarks and licenses is linked here.
View the
