JMRI: Entry/Exit (NX) Tool
For a full description of Entry/Exit (NX), see Entry/Exit (NX) Documentation.Add Entry/Exit Points
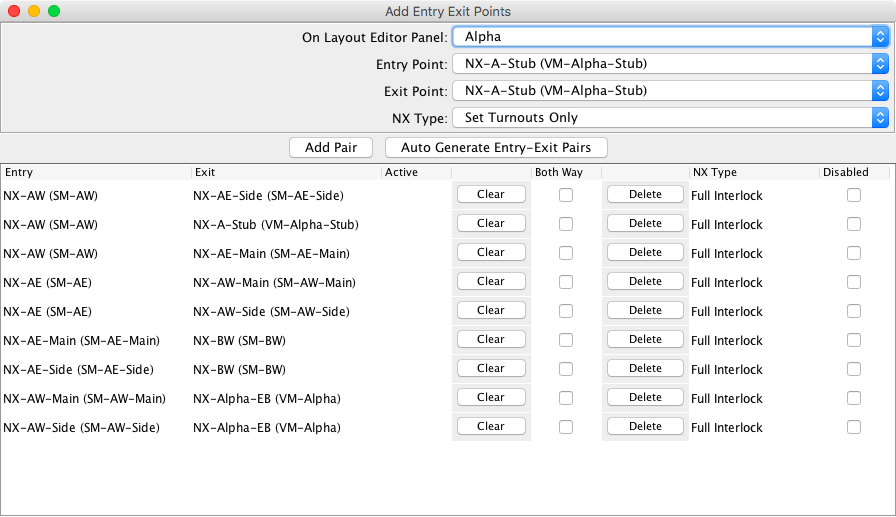
The Add Entry Exit Points pane is accessed from the Layout Editor
Tools menu.
It is used to create and delete Entry Exit Pairs for a given Layout Editor panel. It is also
used to enable the Both Way option and to enable/disable specific NX Pairs
by checking the boxes in the corresponding column.
NX Panel Sensors are assigned at Block boundaries on the Layout Editor
panel by using the pop up menu on anchor points, turnouts, level crossings, end bumpers and
edge connectors.
These sensors act as the NX selection buttons and are used to create the Entry
Point and Exit Point combo box content.
Combo Boxes
When the Add Entry/Exit Points pane is first opened, the Select Panel
selection will be the current Layout Editor panel.
Use the top combo box to configure NX settings for another panel.
The Entry Point combo box list now contains the sensors for the currently
selected panel. The Exit Point list will contain all of the sensors from all
layout editor panels.
The Exit Point can be on another panel as long as the panels are linked using edge connectors.since 4.11.1
The NX Type defaults to Set Turnouts Only.
Buttons
At the center of the pane are two buttons to populate the NX Pair Table:
- Add Pair — Select sensors from the Entry Point and Exit Point lists, select the NX Type and click on Add Pair. Notice: The sensor pair is not checked for validity. Validation has been added as of JMRI 5.5.7. See Add Pair Validation
- Auto Generate Entry-Exit Pairs — The auto generate process will find all of the valid sensor pairs on all of the panels using the Layout Editor Block routing utilities.
NX Pair Table Columns
- Entry — The sensor name for the entry point. If the block boundary has a signal mast, it will be listed in parenthesis.
- Exit — The sensor name for the exit point. If the block boundary has a signal mast, it will be listed in parenthesis.
- Active — Yes when there is a active route.
- Clear — If the entry is active, cancel the route segment.
- Both Way — Enable the ability to press the entry and exit buttons in reversed sequence to create a reversed route. This option is not available if signals are attached to the related block boundaries or the destination is at an end bumper.
- Delete — Delete the NX sensor pair.
- NX Type — The selected NX type for the NX sensor pair.
- Disabled — When checked, the NX pair is Inactive. Attempts to create a route will result in a error dialog.
NX Options
 While the
Entry/Exit (NX) Tools is displayed, its Options menu allows you to set shared settings for the
tool.
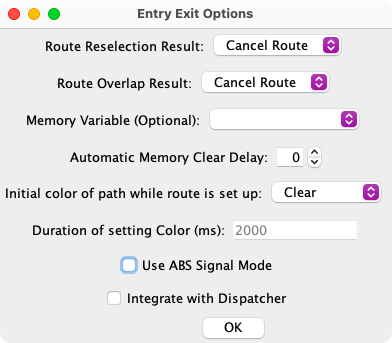
The Entry Exit Options pane contains the following items:
Route Reselection Result — Determines what should occur when the NX route is reselected by the user.
- Prompt User - Ask the user what they would like to do.
- Clear Route - Automatically clear the route down. The blocks in the route will become active and then inactive as if a train had traversed the route. The final block will left active.
- Cancel Route - Cancel the route.
- Stack Route - Stack the route.since 3.4
The next 3 items provide alternate options for using NX when panels are displayed using the JMRI Web Server. The web server cannot handle dialogs so default responses are necessary along with an alternate method for displaying route allocation messages. Note: The Web interface does not support flashing NX icons.since 4.19.3
Route Overlap Result — Determines what should occur when the NX route overlaps an active route.
- Prompt User - Ask the user what they would like to do.
- Cancel Route - Cancel the proposed route.
- Stack Route - Stack the route.
Memory Variable (Optional) — Select a memory variable that will contain any route allocation messages. This provides feedback that can be added to a panel. This helpful when the route overlap is set to cancel or stack since the dialog is not displayed, such as when using browser based panels. The message will be cleared when the next route is selected or after a delay (see below).
Automatic Memory Clear Delay — Automatically clear the memory variable after a number of seconds. Set to 0 to disable automatic memory clearing.
Initial color of path while route it set up — While the route is being setup, set the track color to that in the drop down, after a predetermined time the track will revert back to that defined in the block configuration.
Duration of setting Color (ms) — How long the initial color will be displayed for after the route has initially been selected.
since 5.1.3Use ABS Signal Mode — The default setting for Entry/Exit is to set the signals to held when the NX pair is not active. If the ABS mode is enabled, the signals are not held.
since 5.13.7Suppress the multi-point failed dialog — The failed dialog was added in the JMRI 5.11.4 release. Sometimes the desired action is to fail quietly. This typically applies to scripts creating a multi-point route and doing their own checks for success or failure.
since 5.13.7Revert to the old GUI behavior — The GUI enhancement was added in the JMRI 5.11.4 release. The change was to run the route setting code in a separate thread. This allows the destination sensor to flash which provides feedback that the destination button click was actually accepted. The side effect was that a double click no longer completed a request followed by a new request for the next route. The double click became a route completion request followed by a cancel request for the route that was just created.
Integrate with Dispatcher — Select this option if the NX route is to
extend the path of an Active Train in the Dispatcher module.
This option will only work if the Block prior to the NX route is allocated to a Dispatcher
Active Train and that Block is also the end block.
Back to the Entry/Exit (NX) main help page.
Thanks and congratulations to all who contributed! Contact us via the JMRI users Groups.io group.
Copyright © 1997 - 2024 JMRI Community. JMRI®, DecoderPro®, PanelPro™, DispatcherPro™, OperationsPro™, SignalPro™, SoundPro™, LccPro™, TrainPro™, Logix™, LogixNG™ and associated logos are our trademarks. Additional information on copyright, trademarks and licenses is linked here.
View the
